Categories
Apps How To

WhatsApp Gets New Audio Preview Feature: How Can You Use It?

WhatsApp has added a plethora of new features to its messaging app available for both Android and iOS devices in recent times. The desktop version has also received a fair share of updates in the last few years; specifically following Facebook’s acquisition of the app. Several new features primarily focus on enhancing the privacy aspects and also improving the overall user experience. Another such feature has now been released which will allow WhatsApp users to preview voice messages before sending to any contact. What is this new feature and how can you make use of it? Read on to know:

WhatsApp Audio Preview Feature: What Is It And How Can You Use It?

WhatsApp already offers the provision to send an audio message from any chat window. However, until now there wasn’t an option available to preview the audio clip before sending it. Also, users couldn’t pause the audio message while recording it.

But that changes now as the company has now added this feature wherein you’ll be able to listen to the recorded audio before sending it. The company has shared a new tweet via its official handle on Twitter that confirms the availability of this new feature for the WhatsApp messenger.

Besides, this option will also allow the users to delete the audio file if it isn’t recorded properly. All you’d need to do is click on the trash icon and the file be deleted. It is worth adding that this new feature has been made available for both WhatsApp Android and iOS platforms. It will also be available for the desktop version otherwise known as WhatsApp web.

As for the steps, they are similar to how you record a long audio message but you get to replay the audio before sending it.

Step 1: Open any chat window and tap on the microphone icon.

Step 2: You will need to slide up on the microphone tab to lock it and for hands-free audio recording.

Step 3: Now, you can start speaking your message and click on stop once done.

Step 4: You’ll see an option to replay the audio. If it sounds good and doesn’t require any changes you can click on the send button. Or else, you can click on the trash icon to delete the audio. You can repeat the above steps to re-record any audio message.

Categories
Mobile

Oppo Find N Flagship Foldable Phone Officially Unveiled At INNO Day 2021; Price, Full Specs, Sale Details

Oppo has finally joined the foldable phones bandwagon with the launch of Find N. It is the first foldable handset by the company which will be going up against the likes of the Galaxy Z Fold series and the Huawei Mate X. The company recently teased the first look of the handset and has now taken the wraps off during the ongoing INNO Day 2021 event in China. Let’s look at the features offered by Oppo’s first flagship foldable smartphone:

Oppo Find N Full Design, Full Specifications

The Oppo Find N’s biggest highlight is the foldable display design (centrally folding). It is somewhat similar to the first-gen Galaxy Z Fold but with a landscape ratio for the inner panel. The inner display (when unfolded) measures 7.1-inches and offers an 8:4:9 aspect ratio. This mode is best suited for gaming or reading e-books as per the company.

Oppo further reveals the foldable design is based on a Flexion Hinge which has 136 components with extreme precision of up to 0.01mm. This hinge is said to result in minimal creasing which is 80 percent less visible with the folds. It is an LTPO panel that supports a 120Hz refresh rate. The Oppo Find N’s outer display measures 5.49-inches with an 18:9 aspect ratio and up to 1,000 nits of peak brightness.

Under the hood, the Oppo Find N uses the Qualcomm Snapdragon 888 mobile processor. The premium octa-core flagship processor is coupled with up to 12GB LPDDR5 RAM and 512GB UFS 3.1 storage. Now moving on to the imaging setup, the Oppo Find N features a triple camera setup comprising a 50MP Sony IMX766 lens, a 16MP ultra-wide-angle sensor, and a 13MP telephoto sensor.

The Oppo Find N has a FlexForm mode that allows the device to serve as its own tripod. You will be able to record 4K HD time-lapse and also use light trails, night sky, sun & clouds timelapse modes for astrophotography. For security, this foldable phone is packed with a side-mounted fingerprint scanner.

The Oppo Find N’s spec-sheet is completed via a decent-sized 4,500 mAh battery. The device also employs 33W SuperVooc Flash charge tech which as per the brand can refuel the handset up to 55 percent with 30 minutes of charge. The foldable phone also has 10W reverse wireless charging and 15W AIRVOOC wireless fast charging support.

Oppo Find N Price, Availability Details

Oppo hasn’t yet announced the Oppo Find N’s pricing details. However, it is said to be limited to Mainland China only as of now. It is likely to be available for sale in Q1 2022 in China. The global availability remains a mystery for now, but we expect Oppo to share the remaining details soon.

Categories
Info

Milky Way’s Supermassive Black Hole Is Leaking; NASA’s Hubble Telescope Collects Evidence

Black holes have been one intriguing subject being researched over decades. Scientists and researchers all across have been closely studying the in-depths and are coming across some astonishing developments. A recent study on the supermassive black hole placed at the center of the milky way galaxy suggests it isn’t sleeping as we all believed. NASA’s Hubble telescope was able to collect evidence of the supermassive black hole leaking. But is this a big concern for us? Let’s find out what the latest studies reveal:

Super Massive Black Hole Leak: What All We Know

The latest study revealing a leak in the supermassive black hole placed at the center of the Milky Way galaxy has been published in Astrophysical Journal. According to the journal, multiple researchers have been closely observing the central black hole which emits blowtorch-like mini outflowing jets each time it swallows a star or gas cloud.

The team of researchers has explained how the black hole each time emits mini-jets similar to a gas cloud when it gobbles up something hefty. Geral Cecil from the University of North Carolina and lead author of the published study said, “The central black hole is dynamically variable and is currently powered down.” The outflowing mini jets are said to have the same trajectory as the black hole’s magnetic field.

The journal further reveals the Hubble Telescope has gathered sufficient evidence of the black hole seething following an outburst two million years ago. The data collected by the telescope shows an expanding know of gas is a narrow linear path around 15 light-years away from the black hole. That’s not it, the team conducting the study also got their hands on the infrared images of inflating hot has bubbles aligned to the jet.

Co-author Alex Wagner Of Tsukuba University Japan stated, “The streams percolate out of the Milky Way’s dense gas disk. The outflow creates a series of expanding bubbles that extend out to at least 500 light-years. This larger soap bubble structure has been mapped at various wavelengths by other telescopes.” Wagner further added, “Our central black hole has clearly surged in luminosity at least 1 millionfold in the last million years. That sufficed a jet to punch into the Galactic halo.

Categories
Leaks

Xiaomi Redmi 10 2022 Features Leaked On Google Play Console; Helio G70 SoC, FHD+ Display Tipped

Xiaomi is currently known to be working on its next flagship smartphone series, i.e, the Xiaomi 12. Apart from the upcoming premium smartphone lineup, the company is also prepping up to refresh its mid-range product portfolio with a new Redmi handset. The Redmi 10 2022 is the alleged device in question which as per the fresh leaks would be a regular 4G model packed with a MediaTek Helio G series processor. In the latest development, the device has stopped by Google Play Console where most of its features have been listed.

Redmi 10 2022 Specifications Listed At Google Play Console

The Redmi 10 2022’s Google Play Console listing has been first spotted by Mukul Sharma, A tweet shared by the tipster shows the handset’s front panel and the spec-sheet listed on the Play Console website. The upcoming handset will also feature a punch-hole design and narrow bezels on the sides. The chin bezel is slightly thick comparatively than the sides.

The leaked spec-sheet listed on Google Play Console reveals the Redmi 10 2022’s display, processor, and firmware. The handset is listed with an FHD+ display that will offer 1080 x 2400 pixels resolution. If this will be an LCD or an AMOLED panel is yet to be revealed.

The Redmi 10 2022 will have the octa-core MediaTek MT6979 processor under the hood with two Cortex A75 cores clocking at 2.0Ghz and six Cortex A55 cores with 1.7Ghz clock speed. This chipset will be clubbed with Mali G52 GPU and is otherwise known as the Helio G70 SoC. However, the tipster suggests it could also be the Helio G88 SoC and the listing might get updated in the later stages.

The RAM configurations tipped are 4GB and 6GB, but the storage capacity isn’t specified by this leak. But we can expect 64GB/ 128GB storage options along with expandable microSD card support. The Google Play Console only reveals the Android 11 OS additionally. The remaining hardware aspects such as battery and camera aren’t listed on the website.

But if go by the past leaks, the Redmi 10 2022 might arrive with a 50MP triple rear camera setup. The primary lens is said to be an OmniVision OV50C40 or Samsung S5KJNI sensor which will be accompanied by an ultra-wide and a macro sensor. As far as its expected launch timeline is concerned, we are speculating on an official launch in Q1 2022. The details should emerge soon.

Categories
Tech Gadgets

Oppo Air Glass Breaks Covers At INNO Day 2021; Just A Concept Or Reality?

Oppo has kickstarted its INNO Days 2021 event where the brand is showcasing its latest innovations in the technology space. The Chinese tech giant has been getting all the attention for its first foldable smartphone dubbed Find N which is going to be unveiled tomorrow. Meanwhile, the company has also introduced its first-ever smart glass equipped with the company’s self-developed micro projector and a micro LED. This new smart glass by Oppo isn’t a concept product and is said to be available starting next year in the company’s home town China.

Oppo Air Glass: What Are The Features Offered?

The Oppo Air Glass has been designed on a monocle waveguide design and can be worn like a regular pair of glasses. It has a lightweight form factor and weighs just 30g. The lens is wrapped with a slim frame that tucks inside all the primary hardware components such as a Qualcomm processor and the micro projector.

The frame itself has been launched in two different designs. There is a full black frame, while the other comes with a half-sliver shade. Both frames offer a magnetic latch design that will allow users to attach conventional glasses as per convenience. The company will be shipping two different sizes of each frame.

Speaking of the innards, the Oppo Air Glass uses the Qualcomm Snapdragon Wear 4100 processor and Spark Micro projector developed by the brand itself. This along with the micro-LED and a custom waveguide technology is what allows the smart glass to deliver an AR experience throughout.

The Oppo Air Glass projector’s micro LED is said to offer up to 3 million nits peak brightness. However, the actual value as claimed by the company is 1,400 nits in average conditions. Moving on to the Oppo Air Glass’s compatibility and usability factors, it will support devices such as Oppo Watch 2 and Oppo smartphones that are running on Color OS 11 or above.

You will also need to download the Smart Glass app on your devices to use all the functions. Also, users will be able to use touch, head/ hand tracking to operate the Oppo Air Glass. Gesture support for controls is also available. The company has also installed a bunch of applications (some developed by Oppo) for a better user experience.

When Can We Expect Oppo Air Glass To Go Commercial?

According to Oppo, the Air Glass will be launched commercially in Q1 2022. However, its availability would be limited to Mainland China in black and white color options. There is no word related to its global availability. However, we will keep you posted with the details once available.

Categories
How To

How To Recharge Metro Smart Card Online: A Step By Step Guide

India is one of those countries which is undergoing the digitization process in full swing. The government has been emphasizing majorly on this sector and roping in brands and technologies to move its services and facilities online. Even the private sector in the country is adapting to the modern changes and is offering facilities online for easy customer reach. Online reservations of travel tickets, hotel accommodations, and others are amongst a few of the services being used by the general public frequently. Now, you don’t have to keep waiting in long queues to get your travel ticket. 

The same applies to Metro rail services in Delhi and other states where there is inter-city connectivity via these monorails. Initially, one would require a token to commute using the Metro. Long queues were seen back then at the Metro stations and to curb that, smart cards were introduced. 

If you are a frequent Metro traveler, you must be aware of these pre-paid cards that you can recharge ahead of your commute or while on the go to avoid getting stuck in queues. You can either get them to recharge from the metro stations or can add the balance online. Of course, the latter makes more sense as it not only saves time but also the hassles of overtaking hordes of footsteps at the station. 

If in case you are unaware of how you can recharge your Metro card online, then you need not worry. We have made it easy for you by listing down the process for online Metro card recharge below. Just for reference, you can use both the DMRC (Delhi Metro Rail Corporation) portal and UPI apps to get this done. We have listed down the steps for both. Take a look:

How To Recharge Metro Card Online Using Official Website?

Step 1: Open any web browser on your mobile or laptop/PC and type in www.dmrcsmartcard.com in the address bar. Hit enter.

Step 2: Keep your Metro smart card handy or if you remember the details, start filling it out. You’ll need to fill in the card ID number and the amount. 

Step 3: Click on “Continue” to proceed to the next step.

Step 4: The next page will ask you to submit additional details such as email address and also the payment mode. Select the preferred mode of payment (debit/credit card or UPI apps)

Step 5: Follow the on-screen steps to complete the card or the digital wallet payment.

Step 6: Once the payment is completed, you will receive a confirmation mail for the same.

Step 7: After the payment has been processed, you will need to complete the recharge process at the AVMs installed at the Metro stations. Just place the card on the AVM and select the “valid” option. That’s all the steps you need to follow.

How To Recharge Metro Card Via Paytm?

Step 1: Open the Paytm app on your smartphone.

Step 2: Go to the ‘Recharge & Bill Payments” option and select ‘Metro recharge’.

Step 3: You’ll see the list of available options such as Bengaluru Metro, Delhi Metro, Hyderabad Metro, and Mumbai Metro. Select the desired option. 

Step 4: Now, select the ‘Smart Card Recharge’ option. 

Step 5: Enter the card details along with the amount and click on proceed to complete the payment process.

Step 6: Repeat step 7 as above to recharge your metro smart card. 

Categories
How To

How To Create, Customize Your Own WhatsApp Stickers?

WhatsApp has been quite consistent with bringing new features and services for the masses. The Meta-owned instant messaging platform has been proactive with updating both its Android and iOS mobile apps. Over the last few years, the brand improved its messaging experience by adding options to send stickers, GIFs, and also audio/video files.

The desktop version also known as WhatsApp web isn’t left behind either. Most of the features which you find on the mobile version of the apps have been added to the WhatsApp web as well. Sending stickers as a message is one of such features which you will get on both the mobile app as well as the desktop version.

Most of the time you would have selected a sticker from the available packs or might have downloaded additional from the Play Store. But, are you aware that WhatsApp also allows users to create their own stickers and use them during conversations with any contact? If not, then you are at the right place. This article will guide you with the methods with which you can create or customize your own WhatsApp stickers. Here’s how to do it:

How Can You Create Or Customize WhatsApp Stickers?

To use the WhatsApp sticker feature, you are currently required to download sticker packs from the app itself. There are a bunch of options available by default. But once you scroll down you will get the options to download more from the App Store or Play Store on your devices. There is no direct way of creating your personalized stickers from the app itself. You will need a third-party app for the same.

On the contrary, the company had started rolling out the ‘Sticker Maker’ app for WhatsApp web with which you can directly create and add your sticker packs. This feature was released last month (November 2021) and is expected to be available for the mobile app going forward. The steps listed below will help you create your own stickers using the desktop version.

How To Send Personalized Stickers Using WhatsApp Web?

Step 1: Before you start with the steps, make sure you are using the latest version of WhatsApp web. Once the app is open, go to any chat window and click on the paperclip (attachment) icon.

Step 2: Tap on the stickers tab.

Step 3: Upload an image or select a file from the gallery that you would want to send as a sticker.

Step 4: You can customize the image using a set of tools that will let you crop the image, add text, or even emojis.

Step 5: Once the sticker is created and added to a chat, hit the send button.

How To Create And Send WhatsApp Stickers Using Mobile App?

As mentioned above, the feature to create a personalized sticker using the Sticker Maker app is currently available for WhatsApp web. But, you can download a third-party sticker maker from Google Play Store and get this done.

Step 1: Open Google Play Store and download the ‘Sticker Maker- Make Stickers for WhatsApp stickers’ app. You can also download other similar apps

Step 2: Launch the app after the installation is complete and click on the “+” symbol.

Step 3: You will get the option to add an existing image from the gallery and click a new image/video. There is also an option for text stickers from where you can select from the existing layouts.

Step 4: Once you have selected an image customize it as per your choice and click on “Next” from the top left corner.

Step 6: You can further add customizations from the next page or click on “Create”.

Step 7: Now, you will need to click on “Export” to add the newly created sticker to WhatsApp.

Categories
Reviews Tech Gadgets

Qubo Smart Cam 360 Review: Fits All The Bills

Key Highlights

  • Indian consumers are starting to adopt smart home technology, and this trend will only accelerate
  • Hero Electronix’s subsidiary Qubo has been consistently supplying goods related to smart home security
  • These include locks, doorknobs, alarms, and cameras

Smart consumer electronics products are one of the most rapidly growing sectors across the globe. And ever since smartphone brands have started venturing in this space, the competition has grown stiffer. Not just audio products, but the market has to offer a plethora of smart products such as smart TVs, smart bulbs, and even CCTV cameras. In this article, we are reviewing one of such useful devices which have become a must for modern day’s lifestyle. We are speaking of 360-degree CCTV security cameras.

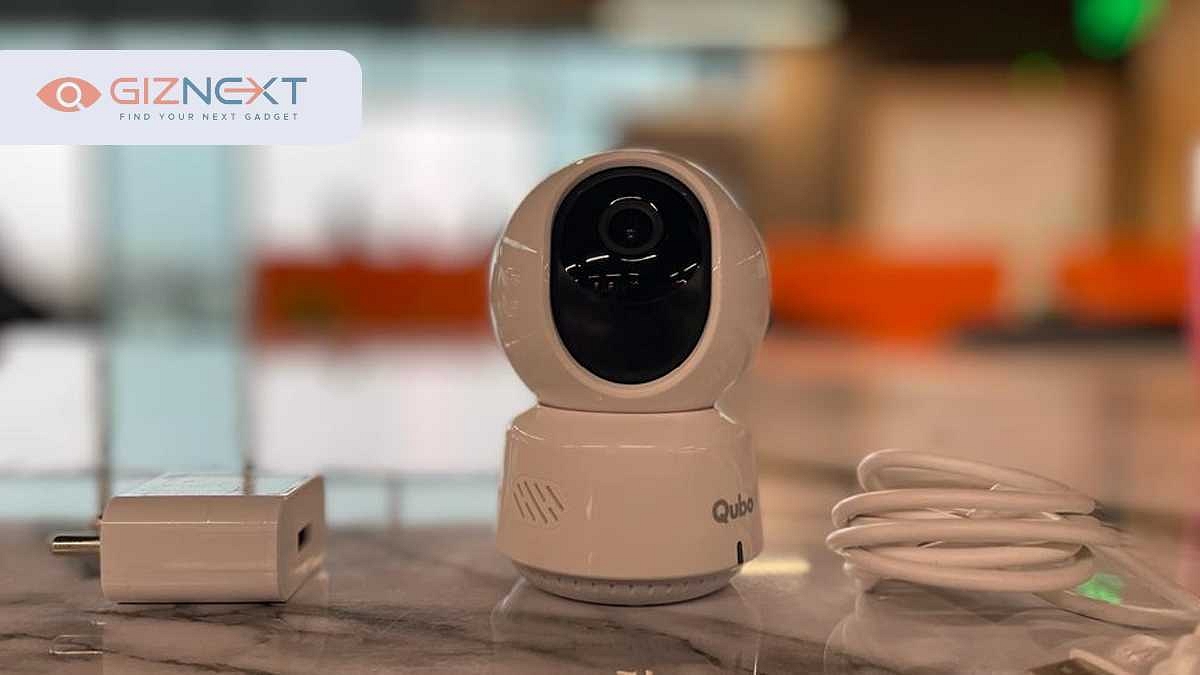
Giznext has received the latest Qubo 360 CCTV security camera from Hero Electronix. The smart 360-degree security camera is integrated with the latest innovations such as AI, motion detection, and 1080p FHD video recording. It tags a price tag of Rs. 2,890 in the country and is aimed towards delivering 24 x 7 security for smart homes as well as small offices and businesses.

This lower price tag pits the Qubo 360 against the Xiaomi Mi Home security camera and the Realme 360-degree security camera. How well the Hero Electronix’s offering fair against the competition and is it suitable for your daily usage? We have broken down all the aspects of whether you should go for it or skip it. Take a look:

Also Read: Best CCTV Camera Under Rs. 5,000 With Memory Card Support In India

Qubo 360 Security Camera Design: Fits Best Indoors

The Qubo 360 security camera will give you a familiar design appeal at the first look. It is a sphere-shaped camera with the upper casing housing a rotatable lens. You’ll be able to relate the design with Xiaomi’s MI Home security camera. It’s the bottom mount that gives both indoor cameras a distinctive appeal.

The overall build material is plastic (except for the lens). The quality is decent and doesn’t seem like the brand has compromised here on the durability aspect. Besides, it offers a compact form factor and would take the least of space on your desk or the corner of the wall you would want to mount it. The smaller size also makes it unnoticeable if it’s tucked in any corner adding to the stealth factor.

It is advised to seat this camera in the areas from where its blind spots can be avoided. Yes, there are a few blind spots since the camera rotation isn’t entirely 360-degree. It rather seems to be flat 180-degree. A microSD card slot supporting up to 256GB storage is placed right below the lens (on the black portion).

The lower mount inscribes the Qubo labeling at the front and speaker grille at the rear along with a microUSB port and the “Set” key. It is worth adding that the company ships a charger and a USB cable with the retail box. There is also an LED that confirms the status of the camera (active/ inactive).

Also Read: Hero Electronix Launches Smart Cam 360 And Smart Door Lock: See Here For Details

Qubo 360 Security Camera Installation Process: Is It Easy?

Installing the Qubo 360 security camera isn’t a big task. You don’t need any specific professional help to get this camera mounted on the tabletop or wall. Once you have finalized the location for the indoor cctv camera to be placed, just get the connections done. This is where you will need the USB cable and the power brick that ships with the retail box. But make sure you have an active power connection close by.

Once you have plugged in all the electricals, you would need to download the Qubo app on your respective Android or iOS smartphones. After the installation is complete, launch the app and select the hamburger icon from the ‘Devices’ tab and then click on “Add Device.” You will now need to select the ’360 cam’ option to get started. That’s all the steps you would need to perform to install the Qubo 360 camera and pair it with your smartphone.

Qubo 360 Security Camera Review: Features, Performance Feedback

It is worth mentioning that to use all the features you would first need to register your account with Qubo. You just need your basic details such as name, phone number, and email address handy. This is an important procedure as you will need a valid account to buy subscription plans later on. As mentioned in the beginning, the  Qubo 360 security camera is fully-loaded with features.

It comes with AI tech and supports FHD and SD recording. Speaking of the specifications, the Qubo 360 security camera packs a 2MP GC2053 sensor which supports 10X Digital Zoom and 106-degree FoV (Field Of View). You can set the camera recording in FHD or SD from the app itself.

This camera also records in the night or low-light situations without compromising on the quality. This is something which we liked. Also, using the app you can set night recordings to infrared or color as per your convenience. The latter would require a bit lesser of space compared to the colored recordings.

The company has also packed in some nifty features which enhance the overall security layers offered by it. Motion detector, Face tagging, and trigger alarms are a few to be named. You can also play police siren audio to fend off intruders in your absence. The audio quality offered by the cam is loud enough to warn people around. Our overall user experience with this new indoor security camera has been satisfying.

No complaints related to the features and video quality. But one of the aspects which we would like to highlight is the absence of dual-band Wi-Fi support. The camera only has 2.4Ghz Wi-Fi which makes, so you’ll have to switch to the same network on your smartphones. It also has Digital voice assistant support which you will come across first during the setup process. Alexa and Google Assistant are the voice assistants that are supported.

Qubo 360 Degree Indoor Camera: Is It Worth An Investment?

The Qubo 360 indoor security camera is a complete package overall in our opinion. You should invest in this product if you want to enhance security in your home or any other required space. The wider coverage area with the moving lens and good image/video quality isn’t the only factor that makes it the best fit for modern days smart homes but the advanced AI features as well.

The only shortcomings we found are the dated microUSB port and single-band Wi-Fi (2.4GHz). Besides, the company is promising a secure environment for the data to be stored both online as well as offline. The data is claimed to be safeguarded with end-to-end encryption which makes it private even at the company servers. If you are considering upgrading your in-house security using a 360-degree security camera, the Qubo 360 is worth an investment. The credit goes to its cheaper price tag and all the advanced set of features.

Also Read: Everything You Should Know About Qubo Handheld Gimbal

Categories
How To

How To Capture Screenshots On Oppo Smartphones? All Methods Explained

Key Highlights

  • Hardware button combination method.
  • Swipe down for quick settings option.
  • Utilize built-in screenshot apps/tools.

Over the last decade, if one gadget which has seen an exponential evolution is mobile phones or smartphones. The tiny handheld devices have become so technologically advanced that they now have the potential to replace bigger computational devices such as laptops and PCs to a major extent. The competition amongst the smartphone OEMs is getting higher with each passing day and we are getting to see new technological innovations and features even with budget-oriented smartphones.

If we speak of the popular smartphone brands then Oppo, Vivo, Xiaomi, Poco, and Realme grab a major chunk of the audience’s attention. Of course, we have Samsung, Apple and other non-Chinese brands that are popular amongst the masses, however, the Chinese brands are dominating this space with their feature-rich yet pocket-friendly devices.

We have been sharing articles that help you with tips and tricks to make use of all the hidden features offered by a smartphone. One of our last articles was centered around Oppo smartphones. We explained the Oppo Share technology and how to use it. This article is also focusing on Oppo smartphones and here we have listed down the steps as to how you can take screenshots using different methods. There are three different ways with which you can capture a screen on Oppo handsets. Below are the steps:

Also Read: Ways To Hard/ Factory Reset OPPO Smartphones: Step By Step Guide

Steps To Take Screenshot On Oppo Phones Using Button Combination

This is one of the most common forms of capturing screenshots on not just Oppo smartphone but any other Android device available in the market. The key combinations might have slight variations depending upon the UI or the brand of a device. For Oppo smartphones, follow the button combinations mentioned below:

Step 1: Open the page whose screenshot you want to capture on your respective Oppo device.

Step 2: Now, press and hold both the power key and the volume down key simultaneously for a few seconds. You’ll see the snap of the page once it has been captured.

Also Read: OPPO Enco Air3 Pro TWS Earbuds Review: Takes The Top Spot?

How To Capture Screenshots On Oppo Smartphones Using Gestures

This is another method that is common amongst new-generation Android smartphones. However, in most cases, you would need to manually enable the settings.

Step 1: If you are using an Oppo handset that runs on Color OS 3.0 then head to the ‘Settings’ menu and click on Gesture& Motion and then Quick gestures. From there select ‘3-Finger screenshot.

Step 2: For Oppo devices running Color OS 5.0/ 5.2 and Color OS 6.0/ 6.1 you would need to select Smart& Convenient> Gesture & Motion> 3-Finger Screenshot and Convenience Aid> Gesture& Motion> 3-Finger screenshot respectively.

Step 3: If your Oppo handset uses Color OS 7.0/7.1 and Color OS 11 or above, the settings you need to follow are Settings> Additional Settings> Screenshots and Settings> Convenience tools> Screenshots> 3-finger swipe down gesture respectively.

Also Read: Redmi Pad SE Vs OPPO Pad Air Tablet Comparison: New-Gen Mid-Range Tablet For Daily Use

What Are The Steps To Take Screenshots On Oppo Smartphones Using Smart Slider?

Apart from the above two methods, you can also use the smart slider bar on your Oppo smartphones to capture screenshots of the desired page. Do note that the smart slider feature is available only for Color OS 5.0 and above.

Step 1: Open the Settings menu and click on the Smart & Convenient option followed by Smart Sidebar (for Color OS 5.0 and Color OS 5.2). Once you see the smart sidebar on the home screen locate the white vertical line which you need to swipe to the middle of the screen to grab the screenshot.

Step 2: For Color OS 6.0/6.1 and Color OS 7.0/7.1, you will need to click on Settings> Convenience aid> Smart Sidebar> Screenshot and Convenience tools> Smart sidebar. The remaining procedure to capture screenshots remains the same as the Color OS 5.0 and 5.2.

Step 3: Likewise, if you are using the Color OS 11 and above, the steps would be identical to the Color OS 7.0 and 7.1.

Also Read: OPPO A78 Review: Worthy Opponent Under Rs. 20,000?

Categories
Mobile

Tecno Spark 8T India Launch Slated For December 15; Amazon Page Confirms Design, Full Specifications

Tecno has officially announced its next budget smartphone for the Indian market called the Spark 8T. This is the second model in this series following the vanilla Spark 8 which was introduced this year itself in the country. The handset is set to make its debut this month in India as confirmed by an official landing page on Amazon. The design, as well as the specifications, have also been revealed by the e-commerce website’s listing. Check out the details below:

Tecno Spark 8T India Launch Date Confirmed

The Tecno Spark 8T will be announced two days from now, i.e, December 15 in India. The dedicated microsite for this new budget smartphone has gone live at Amazon which reveals all the key details including hardware as well as the design language. The ‘notify me’ tab is also present which you can click to stay updated with all the details. It is worth adding that the device will be going up for pre-orders starting December 15, 2021, only.

The company has also announced a contest where three lucky winners will be gifted the Spark 8T. To be a part of the offer, you would first need to click on the ‘Notify me’ tab on Amazon and tweet the screenshot of the image and tag and follow @technomobileindia, @amazonIN. You will also need to use dedicated hashtags, i.e, #Spark8T and @Sparkofbigdreams.

Tecno Spark 8T Design, Hardware Features

The Tecno Spark 8T’s Amazon landing page has confirmed a waterdrop notch display and narrow side bezels. At the back, the upcoming budget handset can be seen wearing gradient skin with a stripe inscribed with “Stop At Nothing” text on the right along with the Tecno Spark 8T branding.

The camera module is big and houses dual sensors along with an LED flash and a physical fingerprint scanner for biometrics. It will be arriving in four different shades including Atlantic Blue, Cocoa Gold, Iris Purple, and Turquoise Cyan.

Now moving on to the hardware, the Tecno Spark 8T’s dedicated Amazon microsite has confirmed a 6.6-inch display. While the panel type isn’t revealed, an FHD+ resolution of 1080 x 2400 pixels, 401 PPI pixel density, and 500 nits peak brightness levels. The Spark 8T’s dual-camera module at the rear will have a 50MP main snapper with an f/1.6 aperture and an additional depth sensor.

The Spark 8T’s selfie snapper will be an 8MP lens tucked inside the waterdrop notch. The camera setup supports portrait images/videos, smile shots, and 1080p time-lapse video recording. Under the hood, the Spark 8T will be using the octa-core MediaTek Helio G35 processor. We are yet to get the RAM and storage configuration details. A 5,000 mAh battery would be rounding off the spec-sheet here.