Categories
Apps Featured How To

WhatsApp Hacks: How To Send WhatsApp Images In High Resolution As Document On iPhones?

WhatsApp is one of the most powerful instant messaging applications which is available for both Android and iOS smartphone users. WhatsApp started its journey as a separate entity but later got acquired by Meta (Facebook). Since then WhatsApp is getting more potent each year and is rapidly getting new features and services for an improved messaging experience be it on Android smartphones or iPhones.

WhatsApp is among those apps that have amplified the messaging experience by allowing the provision of video and audio calls. The app also lets you send images, videos, and locations with your contacts. You can send images in both normal and high-resolution using WhatsApp on Android and Apple iPhones devices. The quality isn’t compromised if you send images as documents on WhatsApp on both these mobile OS.

While sending an image as a document on WhatsApp isn’t tricky with Android, iOS users have to follow some extra steps. Specifically, if you are a new iPhone user who has been using an Android phone all this while, this could be one task for you. So, how can you send WhatsApp images in high resolution as a document on iOS devices? Here’s the trick:

Steps To Send WhatsApp Images As Documents On iPhone

You can’t directly send any WhatsApp image as a document on iPhones. You would require some additional steps primarily saving the image to the device or the iCloud.

Step 1: Open the image that you want to send as a document on WhatsApp on your respective iPhones.

Step 2: Select the Upload tab placed at the bottom left.

Step 3: Scroll down to the “Save to Files” option.

Step 4: Now, select the destination where you want to store and save the image. You can select from iCloud Drive or On My phone options.

Step 5: Click on save.

Step 6: Now, launch the WhatsApp application on your iPhones and go to the specific chat or contact to whom you wish to send images as documents.

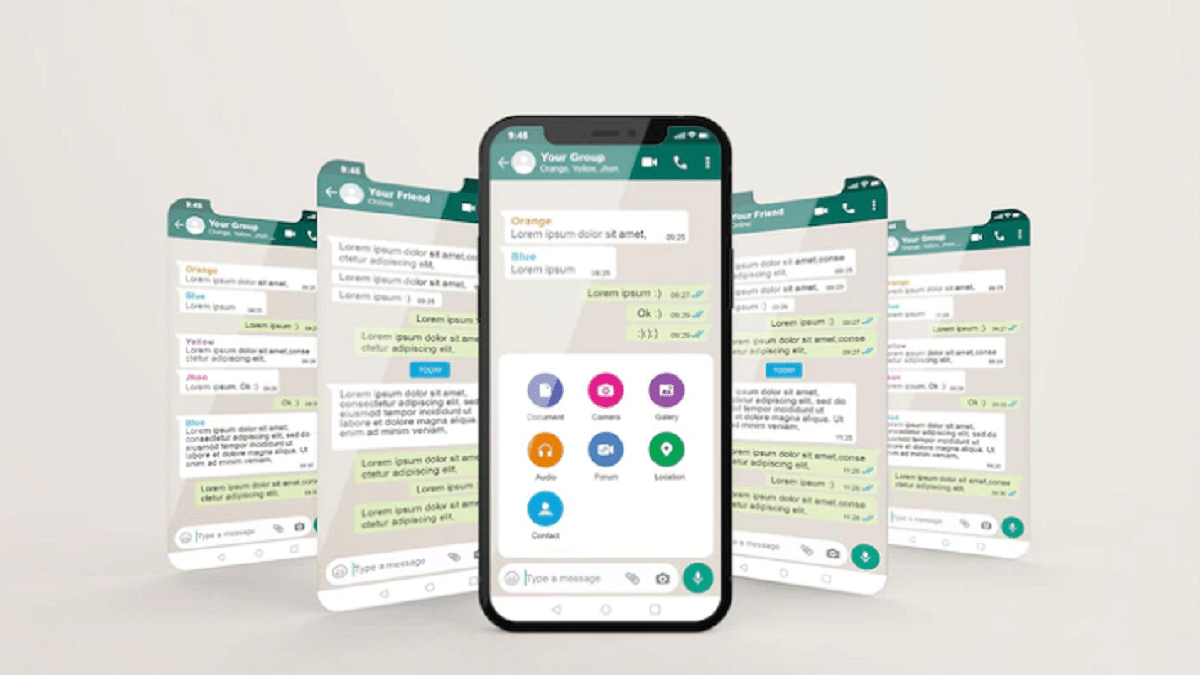
Step 7: Tap on the “Plus” icon placed at the bottom left and select the Document option.

Step 8: Now, select the folder where you have saved the image.

Step 9: Once the image opens up click on Send. The image will be sent as a document to the selected contact.

Categories
Apps Info

WhatsApp Privacy Hacks: Tips You Must Follow To Stay Safe

For instant messaging and phone calls, WhatsApp is our go-to app. The fact that you can message, call, and video call contacts from one platform make things much easier for us. Also, since WhatsApp’s chats and calls are end-to-end encrypted, users don’t have to worry about anyone intercepting their messaging or their calls.

However, while your calls and messages are safe, there are numerous bad elements out there that scam, manipulate and harass people on the platform. To stay safe from people like these, here are some simple steps you can follow:

Enable Security Notifications

Users are informed when there is a security risk to their chats using WhatsApp’s security notifications. WhatsApp uses end-to-end encryption when chatting between two devices. A brief notification informing all chats of the change is sent out in the event that one of the two accounts is transferred to a new device. Therefore, if your WhatsApp account is compromised and accessed from a different location, your contacts will be aware if the feature is enabled.

Two-Step Verification

WhatsApp offers a two-step verification option as an additional security measure. To prevent anyone who is not on your contact list from seeing your texts, all you have to do is make a practical 6-digit PIN code (not your birthday). Go to Settings > Account > Two-step verification > Enable to activate the option. Additionally, include your email address so you can reset your PIN if you forget it.

Tweak Your Privacy Settings

It is advised to adjust the privacy settings if you don’t want others to be able to download your profile photo. Simply setting last seen, profile photo, about, and status to either ‘my contacts’ or ‘only me’ will make the necessary changes.

How to change the privacy preference is shown here. Tap the three dots in the top right corner of WhatsApp when it is open on your phone. The leading tile will launch WhatsApp Settings > Account > Privacy, where you can choose your preferred settings.

Lock Your WhatsApp Account

The social messaging service gives users access to a special fingerprint lock feature. Even if someone manages to get hold of your phone, the feature helps to prevent them from accessing your WhatsApp chats (unlocked). Open WhatsApp > Settings > Account > Privacy to enable the feature. After selecting the privacy tab, go to the bottom and select the fingerprint lock option. Additionally, you can change the timing of the lock screen and enable “show content notifications.”

Categories
Apps Featured How To

Instagram Tips And Tricks: How To Remix Instagram Reels With Videos And Photos

Instagram Reels is one of the most popular features that you get on the photo-sharing app. Meta, widely popular as Facebook, released this short video feature for Instagram back in 2020 as a rival to TikTok and other such apps. Instagram has made several improvements to the Reels since its launch and also added the Remix Reels option last year. This feature allows users to record their own videos and then club them with other popular reels on the platform from other content creators and users.

Not just videos, you can also Remix reels and photos with your Instagram Reel. This is one of the most interesting features that you get to use while creating any Reel video on Instagram. Instagram Remix Reels feature has been out for a long and still if you are new to creating Reels, you might not be aware of the ways to use it. If that’s the case, we will help you with the steps to create and remix any Reel video.

How To Remix Instagram Reel

You can remix any Instagram Reel video using Android and iOS smartphones.

Step 1: Open the Instagram application on your respective Android and iPhones.

Step 2: Click on the three dots option. It will be three horizontal dots for iPhones and three vertical dots for iOS.

Step 3: Click on Remix this reel option. You can set the preference if you want to place the remixed video next to the original video at the same time or later.

Step 4: Click on the Layout option. You’ll see this icon. This option will let you place the layout for the remixed video that you can place either below or next to the original video.

Step 5: Now, all you need to do is record your Reel video.

What Are The Steps To Remix A Feed Video On Instagram

You can easily remix any feed video on the Instagram app. The steps are almost identical to how you would remix any Instagram Reel on the app. Take a look:

Step 1: Once you have launched the Instagram app on your iPhone or Android phone, click on the menu (three dots) option.

Step 2: This time, select the Remix this video option instead.

Step 3: Now, choose the layout as you did above and place the below the original video or next to it. That’s it. Record your Reel and you are all set.

How Can You Remix Any Photo With Instagram Reels

Just like videos and other reels, you can also remix a reel with photos. The steps would be the same as with the remaining two. But the remix photos option isn’t available for all users at the moment, so, if in case you don’t find this option on your Instagram app chances are it’s unavailable in your region. Otherwise, update your app and then check if this feature adds up.

Step 1: Click on the menu option on the Instagram mobile app on your smartphone.

Step 2: Instead of reels and video, you would need to select the Remix this photo option.

Step 3: The photo will be set to default as the background of the reel video.

Step 4: Select the Layout option from the right-hand side if you wish to make any changes. Record your reel remixed with the photo.

Categories
Apps Featured How To

How To Use Gmail Confidential Mode? How To Unsend/ Retrieve Emails On Gmail?

Email services have become one primary mode for written communication across the globe. Different organizations and professional industries rely on emailing services to stay connected with employees and customers. Even the general public uses email services to connect with brands and users whose primary contact details they don’t have. Gmail and Microsoft Outlook are amongst the few big names in email services. The former is managed by Google and you can use its services on smartphones, tablets, laptops, and PCs. Google has been updating Gmail and its services frequently and has added tonnes of features in the last few years.

Google has also enhanced the privacy aspects of Gmail and recently made it easy to use the email services without an active internet connection. With Gmail, you can also use the confidential mode to keep privacy intact. But one of the major hurdles to date has been the missing undo feature. Once you have sent an email from your account, it is hard to retrieve or delete it from the receiver’s device. But if you are using Gmail, you shouldn’t be worried. You can easily unsend or retrieve any recently sent mail if you are using Gmail services. The steps to send confidential mail and to retrieve or unsend any email on Gmail are listed below:

How To Send Confidential Mail On Gmail

Step 1: Open the Gmail app on your respective devices and tap on the compose button.

Step 2: Now, select the confidential mode(timer icon). It is located at the bottom of the compose box.

Step 3: You can select from the two available options including “SMS passcode” and “No SMS passcode”. If you use the former, the recipient would be able to open the email only after entering the passcode. The latter doesn’t require any passcode to open.

Step 4: Compose the email and send it.

How To Unsend Any Email On Gmail App

Step 1: Launch the Gmail app on your smartphones or laptops/ PCs.

Step 2: Write an email using the compose option and add the recipient’s address.

Step 3: As soon as you have sent the email, you will see the Undo option pop up on the screen. Tap on it and the message will be retrieved/ unsent.

Do note that there is a certain time limit to unsend or retrieve messages using Gmail. The minimum timeframe is 5 seconds, while the maximum is 30 seconds. You can set the time limit to retrieve Gmail messages using the following step.

Step 1: Login into your Gmail account in any laptop/ PC.

Step 2: Click on the Settings menu placed on the top right of the app’s homepage.

Step 3: Scroll down to the “Undo Send” option.

Step 4: Set the desired cancelation period. You can select from 5, 10, 20, and 30 seconds.

Categories
Apps Featured How To

iOS 16 Tips And Tricks: How To Add Up To 15 Stops In Maps With iOS 16 Beta

The iOS 16 took the centerstage at the WWDC 2022 even hosted a while ago. Apple released the iOS 16 with some major improvements over the previous-gen versions including the iOS 15 which is currently the backbone of the iPhone 13 series. Apple not just introduced a facelift with the iOS 16 but has also added multiple new features to the new-generation firmware for the upcoming iPhone 14 series and the supported older models. If you have one of the latest iPhones, you can also download and install the iOS 16 beta version and test all the latest features being added to the OS.

We have previously covered the steps to download and use the iOS 16 beta version on eligible phones. Now, we are back with another tips and tricks article where we will be discussing one of the latest features that have been released for the iOS 16 beta version. You will now be able to add up to 15 different stops with the iOS 16. What factors do you need to keep in mind and how can you add multiple stops on a route using the default Maps app on eligible iPhones? Read on to know:

iOS 16 Lets You Add Multiple Stops In Default Maps App

Apple had introduced multiple new features with iOS 16 and Maps isn’t left behind. The option to add up to 15 different stops has now been made possible with the latest iOS beta version. You can make the changes to the stops before starting with your trips on Apple Maps. You just need to enter the destination to where you are traveling and then add the required stops in between the transit route. The steps for the same aren’t tricky and can easily be applied while using iOS 16-powered iPhones. Take a look below:

Step 1: Launch the default Maps app on your respective iPhones. Make sure the device is running on the iOS 16 beta build. Update your phone to the latest build version so that you can use this feature.

Step 2: In the search bar, enter the destination where you wish to travel.

Step 3: Select the driving option. This is the only transit mode where you will be able to add multiple stops to the destination. This feature is currently not supported with public, and bike transit modes. We are not sure if Apple will add this support with the stable iOS 16 version.

Step 4: Add the first stop. To do so, locate the first stop on the map. You can also use the search bar for the same and then select the location.

Step 5: Select the blue direction arrow under the location option.

Step 6: You will see the Add option right above the Routes tab. Tap on it and your first stop is added.

Step 7: Do the same to add the next stops. Only 15 stops can be added to the transit route as of now.

Step 8: If you wish to edit or re-arrange the route then drag the stop by clicking on the menu (three lines option). That’s it. You are all set.

Just to recap, Apple had also added the estimated transit fares on Maps with iOS 16. Another key feature released includes the option to share locations from Mac laptops or PCs to iPhones.

Categories
Apps Featured How To

YouTube Account Hacked: What Should You Do? How You Can Protect Your YouTube Account If Hacked?

YouTube is one of our prime sources of entertainment nowadays. It started as a free platform where users could watch different videos on the go without paying any extra charges for the services. However, Google has gradually released subscription plans with which you can get an ad-free experience on YouTube.

Over the years, YouTube has also improved its policies specifically for content uploading, channel monetization, and more. And ever since YouTube announced monetization policies, content creators have been flooding this platform to make the most of it. You can easily create a channel on YouTube and start uploading videos and earn money out of it. Google has also improved the privacy features on YouTube and has released strict guidelines for users related to the same.

But despite all the security and privacy measures, we come across reports of a YouTube channel hack. This can be a tricky situation if someone gets hold of your account on YouTube and takes entire control making unnecessary changes or even upload videos that aren’t created by you. If you think your YouTube account has been compromised and is hacked, you don’t have to panic at all. We are mentioning some of the best ways with which you can fix your hacked YouTube account.

How To Fix A Hacked YouTube Account Easily?

The first step that you need to check is whether you are able to log into your Google account. If you are able to log in successfully to your Google account, the first thing you would need to do is secure your account. You can also add two-factor authentication to make sure there is no security breach on your YouTube account in the future. If for some reason you are unable to log in to your Google account, follow the steps listed below to recover your account. Then continue with securing your profile.

Step 1: Initiate the Google Account recovery process using this link.

Step 2: Follow the on-screen process to reset your password. You will need to answer the security questions and then complete the account recovery steps.

Step 3: Once the account recovery is complete you can set up the new password. Make sure this time you select a strong password.

How To Protect Your Google And YouTube Account From Hacks

Step 1: Open your Google Account.

Step 2: From the navigation panel, tap on Security.

Step 3: Now head to the “Signing in to Google” option.

Step 4: Select Add recovery option.

Step 5: Toggle on the two-step verification option.

Step 6: Once you setup two-step verification process, you will get two options Your Password and Your Phone.

Step 7: Allow 2-step verification.

Step 8: You can also setup Gmail filters to safeguard your YouTube account from hacks.

Categories
Apps Featured How To

Need Help With Your Instagram Account? Follow These Steps To Get Support

With more than one billion active Instagram users each month, it’s understandable how a customer care department may become overburdened. Users can browse a range of help pages in the extensive ‘Help Center’ offered by the Meta-owned app.

Whatever you need help with will probably be addressed by the Instagram Help Center. Everything from changing your privacy settings to describing how your Instagram feed functions are covered. However, if you discover that you still require assistance, speaking with a human at Instagram may not be entirely impossible. Here’s where to find the Instagram Help Center and how to get in touch with Instagram, if necessary.

Contact The Instagram Support Number

Instagram do have a direct phone number and email – their contact phone number is (650) 543-4800, and their contact email is support@instagram.com. However, it’s unlikely you’ll get a human response through these channels.

Instead, Instagram offers a powerful help center that helps answer most questions and makes it easy to report issues with content you see on the site.

How To Get Instagram Support Through App

Step 1: Open the app and then tap your icon in the bottom-right corner.

Step 2: Tap the parallel bars in the top-right corner.

Step 3: At the bottom of the menu, tap ‘Settings’.

Step 4: Tap ‘Help’ on the next screen.

Step 5: Select ‘Help Center’, and from there you can browse by topic, narrowing in on the issue at hand.

How To Get Instagram Support Via Website

On a computer, you can follow most of the same procedures as above by logging into your Instagram account, but the quickest method to get to the help center is simply entering help.instagram.com into your navigation bar. From there, you can search for your answer. Here’s how:

Step 1: Sign in to Instagram. Access the Help Center by going to help.instagram.com.

Step 2: In the top-right, tap on your profile icon.

Step 3: From the drop-down menu, go to ‘Settings’.

Step 4: Scroll to the bottom of the page and tap ‘Help’.

Step 5: Select an issue or topic listed on the Help Center dashboard. That’s all.

Categories
Apps Featured How To

Instagram Live Broadcast: How To Start, Manage Live Broadcast Sessions On Instagram Android, iOS App

Instagram is one of the biggest names in the social media space. This is a Meta-owned instant photo-sharing app that has gradually become a hot destination for content creators from across the globe. Instagram Reels video is what driving the major audience to this platform. But other features offered by Instagram are also beneficial for influencers that help them interact with the general audience. The Live broadcast feature offered by Instagram is one of them. If you are a social media influencer and wish to host a live Q&A session or wish to live stream any of your events, the live broadcast option will be your go-to option on Instagram or any other social media application such as Facebook and YoutTube.

The Live broadcast option isn’t available just for the social media influencers but also for the general user base. And going live on Instagram isn’t a difficult task. You just need a few taps on the app to get started with your live session. If you are new to the platform or with going live on the application, you need to be aware of the right steps.

Also, you would need an active internet connection with good speeds so that the live session isn’t jittery or pixelated. Here in this article, we have made it easy for you to start your live broadcast session on your Instagram profile and also how you can manage it. Take a look at the steps below:

What Are The Steps To Start A Live Broadcast On Instagram

Step 1: On you Android or iOS smartphone, open the Instagram app.

Step 2: When on the home feed, scroll right to open up the upload page.

Step 3: Scroll down to the Live tab placed at the bottom of the page.

Step 4: Add the title first by tapping the ‘Title’ tab on the left followed by the ‘Add Title’ option.

Step 5: Click on the Live icon. The session will initiate.

Step 6: Once the live broadcast has started, you’ll be able to see the total number of viewers and comments floating at the bottom of the screen.

Step 7: You can end the live session by clicking End on the top right. Select confirm to end the live broadcast session.

How To Manage A Live Broadcast Session During Instagram Live Broadcast Session

With Instagram Live broadcast, you can manage to turn off the comments and requests for collaboration from other users. Follow the steps below to do so:

Step 1: On your Android or iOS devices click on the turn comments off option which you’ll be able to locate at the bottom.

Step 2:  You can turn off the collaboration requests by clicking of Turn off requests to go live option.

Categories
Apps How To

WhatsApp iOS: How To Restore And Export WhatsApp Chats Using iCloud Backup On Any iPhone

There are several factors that have contributed to WhatsApp’s popularity. The end-to-end privacy and advanced features such as voice and video calls are a few to name. Now, if you are a WhatsApp user, you would be familiar with the UI. Be it Android or iOS, there are only notable differences in its functionality. The usability of WhatsApp isn’t limited to just texts. Thanks to all the advanced set of features, WhatsApp now allows users to make audio and video calls, and share voice notes, locations.

WhatsApp is currently testing multiple features with Android and iOS smartphones and is expected to release the stable version going forward. Over the years, WhatsApp has also released the provision for group conversations and has made several improvements with both private and group chats. WhatsApp chats are end-t-end protected and they aren’t stored on the company’s server.

But that doesn’t mean you will lose the old conversations if they are not being used or if in case you are setting up a new device. With the latter, you can even restore the older conversations. This chat restore method can be easily accessed by both Android and iOS users.

We previously guided you with the steps to create a chat backup on iCloud both manually and automatically. Once you have done that, it becomes easy to restore chat backups on your iPhone. In addition to the chat restore, we are also listing down the steps to export chat history on iOS-powered iPhones.

How To Export WhatsApp Chat History On iOS

Step 1: On your iPhones, launch the WhatsApp application.

Step 2: Go to the individual chat or the group chat window that you wish to export.

Step 3: Now, click on the contact’s name or group subject.

Step 4: Select the Export chat option.

Step 5: Click on Attach Media if you wish to export the chat history along with the media files. Select the ‘Without Media’ option if you want to avoid sending the media files.

Step 6: Launch the Mail application. Click on More for extra options.

Step 7: Now, type in your email address and click on Send.

How To Restore WhatsApp Chat History From iCloud Backup On iOS

As previously mentioned, WhatsApp chats can only be restored if you have created the backup on iCloud. You would first need to check if the iCloud backup is present and then only you can restore the chat backup.

Step 1: To verify an iCloud backup is present on your respective iPhones launch the WhatsApp application and go to the settings.

Step 2: Click on Chats.

Step 3: Select Backup. You will be able to see when was the last backup taken. You will also get the option to delete and reinstall WhatsApp.

Step 4: Enter your phone number for verification and complete this process.

Step 5: Follow the on-screen steps to restore the chat history on your respective iPhones.

Categories
Apps Featured Info

YouTube Tips And Tricks: Best Features You Must Try On Your Phone

YouTube mobile app is probably one of the easiest methods to use the platform. Both Android and iPhone apps are frequently updated. Its every update brings out a set of new features. Now, the YouTube app hardly ever lacks a feature. From using the Picture-in-picture feature and creating a shareable link at a particular period in a YouTube video, here are several YouTube features and tips you should be aware of.

Create GIFs From YouTube Videos

YouTube videos can be turned into GIFs far more easily than most people realize. By adding ‘GIF’ before ‘YouTube’ in the URL bar, you will be taken to a website where you can make GIFs with particular lengths. You can also visit the site and upload the video URL there. Additionally, you can add captions, stickers, and a few simple effects. The site, gifs.com, can also be used to create GIFs from videos downloaded from other websites, such as Instagram and Twitter, using the website gifs.com.

YouTube Restricted Mode

The restricted mode in YouTube is something you’ll need if your account is shared by children. By turning on this mode, they won’t encounter any mature or adult content on the platform. Just turn on the toggle for restricted mode under the General menu in YouTube Settings. However, one needs to turn on this mode on all devices individually.

Create Shareable Link For Specific Time

You can make a shared link if you’re viewing a long video and only want certain people to see a portion of it. All you have to do is access the relevant YouTube video, select Share, and select the Start time option by checking the box. Choose the start time, then copy the link that can be shared. Simply copy and paste it now to share it on other social media sites.

YouTube Picture In Picture (PiP) Feature

Users can access YouTube while using other apps at the same time. Picture-in-Picture is the name of this feature. But it only applies to non-musical content. Simply press on your profile photo, scroll down to the Settings area, then tap it to activate this mode. Next, select General from the menu and use the toggle to enable Picture-in-Picture.

YouTube Transcripts

Every video on YouTube has an automatic transcription of the audio into text that is accessible to anybody. To view the transcript, click the ‘more’ tab and choose ‘transcript’ from the drop-down menu. While uploading the video, you can also add the transcript, either as a pre-written file or by typing it out while you view the video.