Categories
Apps Featured

AI Image Editing Finally Coming For Gemini App:

Key Highlights

  • Google confirms AI Image editor for Gemini App
  • Will allow editing images directly via Gemini app
  • Will support up to 45 different languages
  • Can draft a storyline and provide images for the same

Gemini, the AI chatbot from Google is all set for its next big update and will become one of the most powerful AI tools for image editing. This development comes with Google’s announcement confirming the AI image editing integration in Gemini app. This upcoming feature will definitely be a game changer for Gemini. Here are all the details you need to know:

For the tech geeks, stay updated with the latest cutting-edge gadgets in the market, exclusive tech updates, gadget reviews, and more right on your phone’s screen. Join Giznext’s WhatsApp channel and receive the industry-first tech updates.

Also Read: Exam Results: How To Check CBSE, ICSC, ISC, UPMSP Exam Results Via Digilocker App

Gemini AI Image Editing Feature: When Is The Stable Update Rolling Out?

Google via an official blogpost has announced this new AI image editing feature for Gemini app. While the date for stable update release is not mentioned, it is expected to make its way to all Gemini app users gradually in a phased manner. Once the mass update is complete, users will be able to directly upload images to Gemini app and edit it as per their requirements. No third part app will be required for the same.

Also Read: Gemini Live Camera, Screen Sharing Now Free For All Android Users: How To Use

Gemini AI Image Editing: The Possibilities!

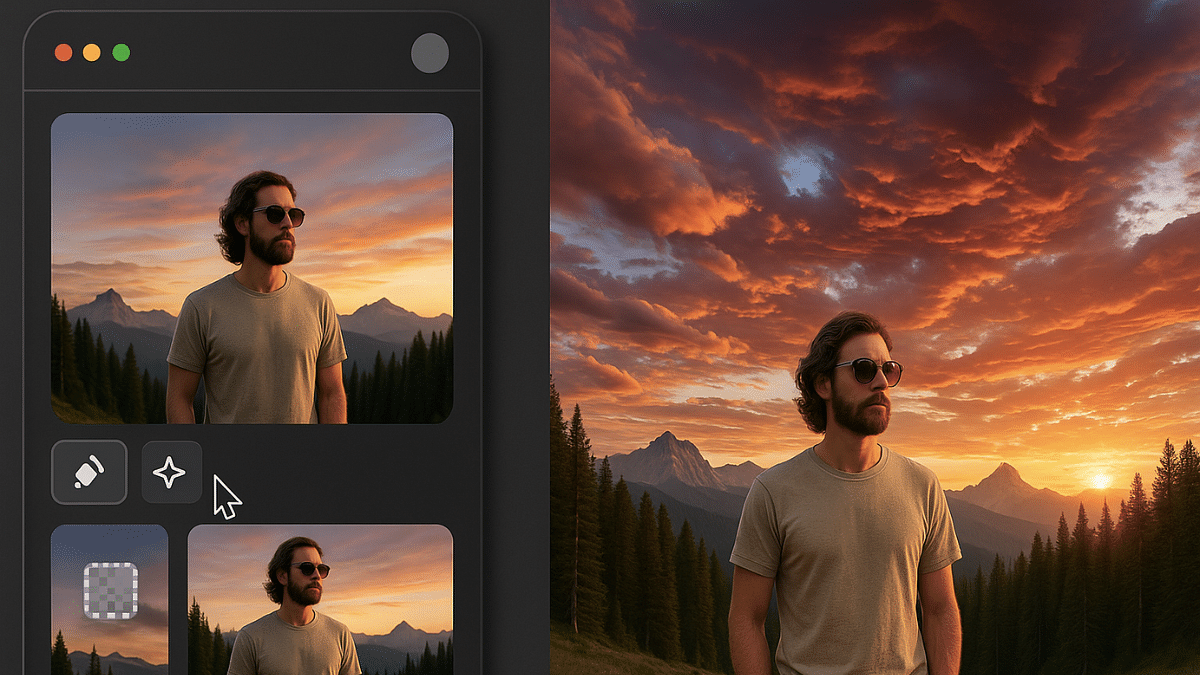
Google is finally adding the native AI image editing to make Gemini a potent editing tool. Besides basic edits, users can do a lot more and even get help with creating storyline on different topics along with images.

Users will get the option to both upload image directly to Gemini app via phone or laptop/ PC gallery and use AI image creation. For the latter, one simply need to give commands as to what are the image requirements, how should the subject be placed, background type, etc.

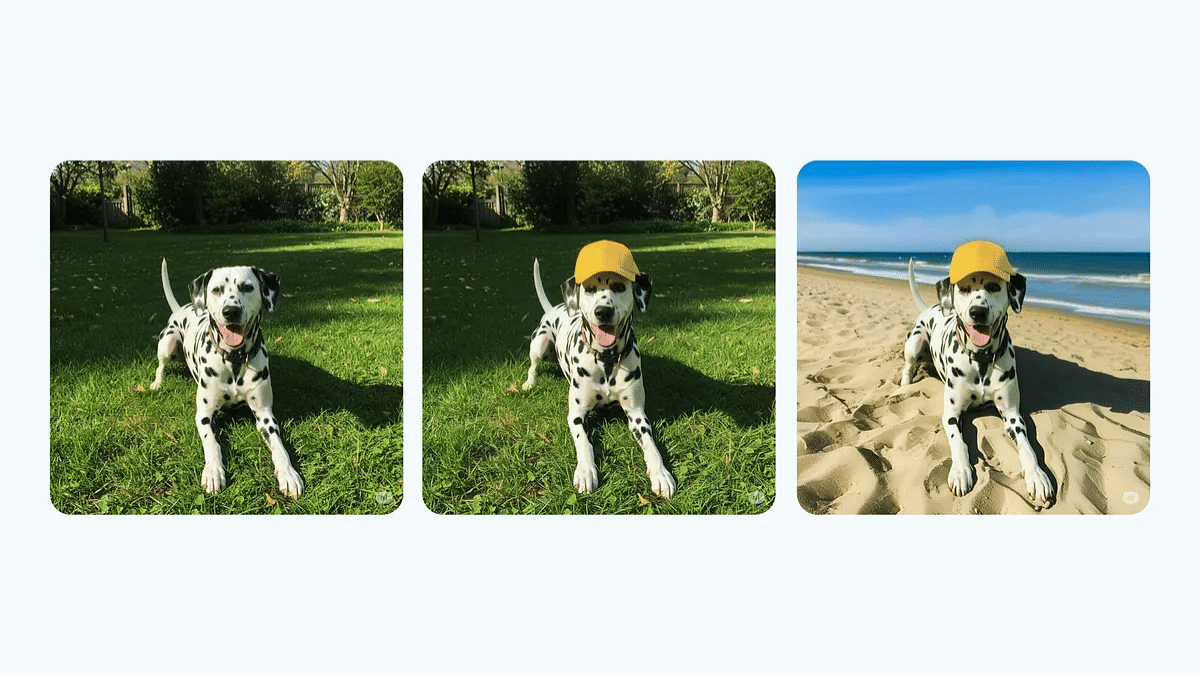
As for the image editing capabilities, users will be able to do basic and advance levels of editing. This surely will make Gemini app more convenient for both general users as well as creators and professionals. From replacing objects to adding a new one and changing the background using AI image editing will be possible once the update is released.

Additionally, this AI image editing feature will allow users to create a storyline using AI and also get images simultaneously on the same storyline. Users will be also be able to give text-based commands or prompts for editing any image that is created using AI or is uploaded from the gallery.

Categories
Auto Tech Featured Info

Soaring Summers, Rising Risks: Best Ways To Protect EVs From Fire Damage And Accidents This Summers

Key Highlights

  • Rising heat in summers can damage EVs
  • Electric vehicles prone to fire accidents in peak summers
  • Battery failures and component heating can also damage EVs in summers
  • Smart charging and parking helps prevent fire accidents

Summer season tends to bring along constant worries for EV owners. Fire accidents related to EVs have been reported frequently despite OEMs using advanced tech including battery management, smart charging, etc. That’s due to the fact that components in an EV, specifically, the battery pack is highly flammable and it’s almost impossible to instantly put it off which can lead to massive damages. This year too Summers right from the beginning have been hot and its getting hotter with each passing week. For the EV owners, we have brought you the tips and tricks to protect your vehicle from fire damages and accidents.

For the tech geeks, stay updated with the latest cutting-edge gadgets in the market, exclusive tech updates, gadget reviews, and more right on your phone’s screen. Join Giznext’s WhatsApp channel and receive the industry-first tech updates.

Also Read: Drive Smart And Safe: List Of Top Electric SUVs With Advanced Safety Features In India In 2025

1. Avoid Parking Your EV And Charging Under Direct Sunlight

Direct heat on your EV can lead to component failures and also increase the battery’s thermal temperatures. When temperatures are already soaring and you charge the EV under direct sunlight, it can directly impact the battery and could lead it to overheating. This poses risks such as battery blast or fire accidents. Similarly, parking the EV under direct sunlight can eventually lead to increased cabin temperature which can also fuel fire related accidents.

  • Charge your EVs at night or early morning
  • Use shaded charging stations or areas to keep your EV safe from overheating
  • Use sunshade accessories while charging or parking at open space
  • If your EV compatible app as pre-cabin cooling feature use it

Also Read: EV Range Anxiety: How To Locate Nearest EV Charging Station Using Google Maps

2. Avoid Storing Flammable Objects

Whether its an EV or your regular ICE four wheeler, keeping flammable objects inside the cabin could be dangerous. Electronics with flammable batteries, aerosols such as deodorants and perfumes, and electric vapes are amongst such items that can blast and pose fire risks when exposed to heat. Ensure you don’t store any of such item in your EV, specifically if it’s being parked in open under direct sunlight.

Also Read: Best Electric Scooters With Long Range And Affordable Price In India

3. Avoid Overcharging EV Batteries And Use Smart Battery Management Systems

Overcharging batteries can lead to heat up issues which can eventually lead to fire accidents and blasts. This is why it is always advised to not overcharge EV batteries when the temperatures are already at peak. Charging the batteries smartly and not to full 100 percent will make sure there is no additional load or temperature instabilities. Besides, most of the new-age EVs comes with smart battery management tech where the power cuts-off automatically when the battery is charged 100 percent

  • Stick to ideal charging range of 20- 80 percent
  • Avoid full 100 percent charge if afternoon
  • Try using Level 2 smart chargers that comes with built-in thermal management systems

Also Read: Buying Your First EV? How Can You Setup EV Charger At Home

4. Keep A Check For Faults And Error Signs

If your EV’s intrument cluster shows any warning or error sign, don’t overlook it. Rather pay attention and get the issue fixed. Even if there is a small error or issue, it can lead to serious troubles specifically if your EV is running at highways in scorching heat.

  • Don’t try to fix such errors and issues without professional help
  • Pull over and call for road side assistance (RSA) if required

Categories
Featured Info Mobile

Top 5 Effective Tips To Click High-Resolution Low Light Photos Using Smartphone Camera

Key Highlights

  • Mobile camera photography is the new hype
  • Smartphones with multi-camera sensors are standard in the market
  • Dedicated modes available for low-light photography using smartphones
  • More steps listed below

Mobile cameras over the years have evolved drastically. With multiple sensors combined in a smartphone, the point-and-shoot photography experience has reached a whole new dimension. No complicated manual camera settings is now required to get that perfect click if you are using a modern-age smartphone. Most of the modern day mobile cameras are well equipped to handle daylight and night scenes. But for the latter, default settings might not always do the trick. If you too have been struggling to get that perfect low-light clicks then you have stopped by the right place. Here in this guide, we are helping you to make the most out of your smartphone camera and capture high-resolution photos in low-light conditions.

For the tech geeks, stay updated with the latest cutting-edge gadgets in the market, exclusive tech updates, gadget reviews, and more right on your phone’s screen. Join Giznext’s WhatsApp channel and receive the industry-first tech updates.

Also Read: Lenovo Tab K11 Enhanced Edition Review: Fits All Bills?

Tip 1: Switch To Night Mode If Required

Night Mode is a dedicated mode available commonly in smartphone’s default camera app. It’s functionality is to make use of computational photography to process high-quality low light images. It does so by merging multiple frames while making the final output brighter than the default settings in low-light conditions.

  • Reduces grains and noise in the final output
  • Might require a tirpod or stable surface to keep the phone still during image processing

Also Read: 5 Tips To Avoid Smartphone Overheating

Tip 2: Use Manual Focus And Focus Lock

One of the common issues that you will experience while capturing a low-light shot is the focus loosing out. You should consider adjusting the focus manually instead os using the auto focus mode. Also, lock the focus on the subject to get that perfect frame during night photography.

Also Read: Enhance WhatsApp Privacy: How To Blur Images On WhatsApp Mobile, Desktop App

Tip 3: Consider Switching To Pro Mode And Adjust Exposure/ ISO/ Shutter Settings Manually

Pro mode helps you capture that perfect night shot. You can manually adjust the exposure settings and shutter speeds for the high-res output. Just for reference, lower ISO levels and slower shutter speeds generally gives better output with low-light shots.

  • ISO Range: Set it between 200- 400 initially. Check the output and increase if required.
  • Shutter Speed: Should be lower ranging between 1/4 to 1/2 seconds.

Also Read: Best Selfie Camera Apps For Android

Tip 4: Ensure Camera Lens Is Clean

A common mistake that stops us from getting better quality images. While the camera lens might look clean, it could have a fine layer of dust or fingerprint that can easily ruin the image/ video quality. Ensuring camera lens is clean will definitely improve the image quality overall. Only use a soft cloth that too gently to clean the camera lens. Make it a practice every-time before you capture a shot.

Also Read: Best Apps To Detect Hidden Camera For Android And iOS

Tip 5: Stick To RAW Format For Better Editing

If you can edit photos, then clicking any photo in low-light in RAW format will make it easier to edit later. Overall details retention is higher in the RAW format as compared to JPEG or any other format. Besides, you can later use dedicated editing tools such as Adobe Lightroom, Snapseed, Canva etc., to further refine the quality.

Categories
Apps Featured How To

Instagram Edits: New Standalone Editing Insta Tool? 10 Easy Steps To Use!

Key Highlights

  • Instagram launches standalone editing app called Edits
  • Introduced for both Android and iOS platforms
  • Allows editing videos for reels and more directly

Instagram has emerged as one of the most used platforms for social media engagement. It is one of those multimedia sharing apps where when can get as creative as they can with photo and video uploads. And to provide a consistent and diverse experience, new updates frequently makes way to this social media platform. A new feature rather a standalone app has now been introduced by Instagram that brings along a whole range of comprehensive editing tools for video/ photo editing and also monitoring performance of the uploaded content. What is this latest Instagram Edits app and how can you utilise it as a editing tool and a performance analyser simultaneously. We explain in this article:

For the tech geeks, stay updated with the latest cutting-edge gadgets in the market, exclusive tech updates, gadget reviews, and more right on your phone’s screen. Join Giznext’s WhatsApp channel and receive the industry-first tech updates.

Also Read: How To Use Instagram’s New Song Lyrics Feature In Reels: A Step-By-Step Guide

What Is Instagram’s Edit App?

Instagram Edits is the latest Meta-developed app that has been designed to help content creators to improve their quality of content being uploaded on the platform. This AI-backed app brings along a host of features ranging from AI-backgrounds, green screen, sound and visual effects pre-set, and more.

Instagram Edits will also allow users to remove background from a video and replace it with another in real time. Besides using pre-recorded footages from the gallery, Instagram Edits allows recording directly via the app where the videos can be recorded to up to 4K resolution@60fps. Edits currently supports shooting and recording videos of up to 10 mins.

Also Read: Instagram Top Hacks: How To Enable or Disable Sensitive Content From Home Feed

How To Download And Use Instagram Edits On Android and iOS

Step 1: Open Google Play Store or Apple App store on your smartphones

Step 2: Enter Instagram Edits in the search bar and tap on Install

Step 3: Open the Instagram Edits app

Step 4: Use your existing Instagram user ID and password to log-in

Step 5: To start a new project, tap on “+” icon.

Step 6: You can either import an existing video or image for the gallery or start a new recording. Tap on the capture icon for the latter.

Step 7: Toggle between the different lenses and apply if you want while recording a new clip

Step 8: Now, edit the video using AI-backgrounds, filters. You can also merge clips, use transition effects, add music, etc.

Step 9: Once done, tap on Export.

Step 10: You can share this edited video directly on Instagram and Facebook without switching the app.

Categories
Apps Featured Info

Duolingo Adds 148 New AI-Powered Language Courses: Largest Update Yet

Key Highlights

  • Duolingo launched 148 new AI-made language courses
  • Courses are now available in 28 different app languages
  • AI will play a big role in how Duolingo works and hires

Duolingo has just taken a giant leap forward with the launch of 148 new language courses, its biggest content update ever. What makes this expansion even more exciting is that all the new courses were built using Duolingo’s own AI tools. Here’s everything you need to know about Duolingo’s AI-powered upgrade.

Also Read | Duolingo Delight: Top Five Features For Effortless Language Learning

Biggest Course Launch In Duolingo’s History

  • Duolingo added 148 new language courses, more than doubling its total offerings.
  • These courses were created in under a year using generative AI, a huge jump from the traditional process, which usually took years for just one course.

Powered By AI, Built For Speed

  • The platform used a new AI system called “shared content systems”, where a base course is created and then adapted into other languages.
  • This AI approach allowed the company to quickly scale and improve access to quality content.

Available In 28 User Interface Languages

  • The expansion ensures that Duolingo’s seven most popular non-English languages, Spanish, French, German, Italian, Japanese, Korean, and Mandarin, are now accessible across 28 UI languages.
  • This means over a billion global users can now learn in a language they are comfortable with.

More Learning Options For All

  • New courses let Spanish and Portuguese speakers learn Japanese, Korean, and Mandarin.
  • European language speakers can now access more Asian language courses.
  • Asian language users, who earlier only had English options, now have access to all top non-English languages.
  • All of the most popular non-English languages are now available to Asian language users, who previously had just English alternatives.

Also Read | Top 4 Language Translation Apps For Smooth International Travel

What This Means For Learners

Duolingo’s AI-first shift makes language learning faster, smarter, and more accessible. With more language combinations now available, learners from all over the world can connect and grow like never before.

For the tech geeks, stay updated with the latest cutting-edge gadgets in the market, exclusive tech updates, gadget reviews, and more right on your phone’s screen. Join Giznext’s WhatsApp channel and receive the industry-first tech updates.

Categories
Apps Featured How To

Want Free Delivery And Streaming? Here’s How To Join Amazon Prime On Mobile

Key Highlights

  • Sign up for Prime easily on your phone
  • Enjoy a 30-day free trial
  • Plans start at Rs. 299 per month

Are you someone who loves online shopping, binge-watching movies, or hunting for the best deals and discounts? If yes, then an Amazon Prime membership is something you should definitely consider. There are many benefits to Prime, including free delivery, Prime Video, and exclusive offers. Signing up is simple and quick, regardless of whether you’re using a desktop computer or a smartphone. To help you get started right now, here is a simple, step-by-step guide.

Also Read | How To Cancel Amazon Prime Subscription: See All Step Here

How To Install Amazon Prime On Your Smartphone

Signing up using your mobile is super simple. Just follow these steps:

Step 1: Open your mobile browser and go to Amazon Prime Page. This is where you’ll begin your Prime journey.

Step 2: Don’t have an Amazon account yet? Tap “Create Account”.

Step 3: Enter your password, name, and phone number. To get an OTP, tap “Verify mobile number.”

Step 4: If you’re an existing Amazon user, skip the account creation and simply log in with your details.

Step 5: Choose “Try Prime Free” after tapping the three-line menu.

Step 6: Press the “Start your 30-day free trial” button.

Step 7: Choose your Prime plan, confirm your billing and shipping details.

Step 8: You will be charged automatically when the trial period is up. If necessary, cancel at any moment.

For a better and faster shopping experience, download the Amazon app from your play store/ app store. It makes browsing, tracking, and shopping much easier.

Amazon Prime Membership Plans In India

Plan TypePrice
MonthlyRs. 299
3-Month PlanRs. 599
Annual PlanRs. 1,499

Also Read | Stay Safe While Shopping Online: Five Easy Tips To Avoid Getting Scammed

Why Prime Is Worth It

  • Many items come with free one- or two-day delivery
  • Special access to Prime-only offers and Lightning Deals
  • Prime Video and Prime Music streaming is unlimited
  • Prime Reading and gaming benefits

Whether you’re shopping, streaming, or saving, Prime has something for everyone.

For the tech geeks, stay updated with the latest cutting-edge gadgets in the market, exclusive tech updates, gadget reviews, and more right on your phone’s screen. Join Giznext’s WhatsApp channel and receive the industry-first tech updates.

Categories
Featured How To

Top 5 Effective Methods To Book Cheapest Flight Tickets In India In 2025

Key Highlights

  • Flight fares have become competitive in India
  • Dynamic pricing allows selecting cheaper flight tickets
  • Third-part apps for flight price comparison and booking available
  • Flexibility with travelling dates helps getting flight tickets at cheaper rates

India has witnessed a rapid growth in the domestic as well international air travel. And certainly, the demand for cheaper flight tickets is higher than ever. This has led to a competitive market for the flight operators in India where customers are being offered different schemes to avail cheaper air fares for both domestic as well international travels. Be it for your next business meeting or a vacation, you can book flights at much lower rates if you know the right tricks. Here in this guide, we are listing down the ways with which you can purchase flights tickets at cheaper rates than usual.

For the tech geeks, stay updated with the latest cutting-edge gadgets in the market, exclusive tech updates, gadget reviews, and more right on your phone’s screen. Join Giznext’s WhatsApp channel and receive the industry-first tech updates.

Also Read: Hate Standing In Long Queues: Here’s How To Book Indian Railways Platform Ticket Online

Method 1: Advance Booking Is The Best Trick

Booking air tickets in advance can help you get maximum benefits. And you don’t have to wait for any special festive season or other discount deals. Booking made mid-week also tends be be cheaper compared to weekend or week’s start.

  • Try making reservations within an average span of 6- 8 weeks prior your travel date
  • Book tickets for Tuesdays or Wednesdays as they are cheaper compared to the rest of the week

Also Read: Smart Travel Guide: How To Apply For And Get Indian Railways Ticket Refund Via IRCTC

Method 2: Flexibility With Travel Dates And Airport Location Helps

If you are flexible with your travel dates, you might find a better deal on your air tickets. Also, flight arrival and departure timings if selected appropriately can help you bag cheaper flight tickets for your next travel. Also, opting for nearby airports can work sometime.

  • Check for air fare pricing for different dates using flight ticket comparison sites and apps
  • Consider flying via Red-eye flights (ones that operate early morning or late night)
  • Skip you travel during peak season including festivals, school vacations, etc. Ticket prices can go higher in such scenarios.
  • Check connecting flight prices and compare rates for other nearby airports

Also Read: DigiYatra Tips And Tricks: How To Add Flight Boarding Pass For Hassle Free Travel

Method 3: Check And Book Flight Tickets Via Flight Comparison Websites And Apps

There are multiple such platforms online that compares flight tickets and also allows booking in advance. There are a bunch of popular travel websites and apps such as MakeMyTrip, Ixigo, GoIbibo, etc. that can help you compare flight ticket prices and make the reservations at cheaper rates. Google Flights, Skyscanner are other popular platforms for the same.

Also Read: Vacation Planning Guide: 5 Effective Ways To Make Use Of AI For Travel Planning In 2025

Method 4: Skip Add-Ons Or Upgrades

You can opt-out of any add-ons to cut down on the higher flight ticket costs. Making bookings via low-cost carriers such as IndiGo airlines and Air India Express can also do the trick.

  • Avoid taking extra add-ons such as seat upgrade, travel insurance, and meals (if it’s a short flight).
  • Try carrying light luggage to avoid additional check-in luggage fees

Also Read: List Of Best Instagram Hashtags For Travellers

Method 5: Use Coupon Codes, Reward Points/ Air Miles, etc.

This is another solid trick that bets you get cheaper air tickets. Often airlines announces discounts on ticket prices to boost sale. Try taking advantage of such promotional offers. Also, most of the airlines provide reward points or air miles to frequent travellers which can be used to book cheaper flight tickets.

Categories
Apps Featured Info

From Hania Aamir To Ali Zafar: Instagram Bans Hit Pakistani Celebrities In India After Pahalgam Attack

Key Highlights

  • Instagram bans profiles belonging to Pakistani actors in India
  • 16 YouTube channels from Pakistan banned
  • India takes strong action after Kashmir terror attack

Indian fans wake up to find top Pakistani celebs like Hania Aamir and Mahira Khan suddenly vanish from their feeds. When fans in India try to access these profiles, they see a message saying, “Account not available in India. This is because we complied with a legal request to restrict this content.” This comes amid ongoing political tensions between India and Pakistan following a deadly terror attack in Kashmir on April 22. Here’s everything you need to know.

Also Read | Instagram Account Hacked? Immediate Steps To Take If Instagram Account Is Compromised

Pakistani Celebrities Blocked On Instagram In India

Several big names from Pakistan’s entertainment industry are no longer accessible to Indian Instagram users. These include:

  • Hania Aamir
  • Mahira Khan
  • Ali Zafar
  • Sanam Saeed
  • Bilal Abbas
  • Iqra Aziz
  • Imran Abbas
  • Sajal Aly

While fans are upset about not being able to follow their favorite stars, it’s important to note that not all Pakistani celebrities are blocked. For example, Fawad Khan and Wahaj Ali’s profiles are still visible to users in India.

16 Pakistani YouTube Channels Also Banned

Instagram is not the only social media platform subject to this ban. Additionally, 16 YouTube channels from Pakistan have been blacklisted by the Indian authorities. These channels were allegedly spreading false narratives and sensitive content targeting Indian security forces and creating communal tension.

Shoaib Akhtar’s YouTube Channel Taken Down

One of the most prominent takedowns was the YouTube channel of former cricketer Shoaib Akhtar, which had over 3.5 million subscribers. His channel was removed as part of this wider crackdown on digital content coming from Pakistan.

Why Is This Happening?

The restrictions come after the terror attack in Pahalgam on April 22, which claimed 26 lives. In response, India has taken a number of aggressive measures to censor sensitive content and false information online, such as banning YouTube channels and social media accounts associated with Pakistan.

Also Read | The Insta-Famous Five: Check Top Five Most-Followed Instagram Accounts

What It Means For Indian Users

If you try to search for these Pakistani actors or YouTube channels from India, you’ll likely be met with an “Account not available” message. This is due to a legal compliance request made by the Indian government to restrict content that could potentially incite unrest or misinform the public.

For the tech geeks, stay updated with the latest cutting-edge gadgets in the market, exclusive tech updates, gadget reviews, and more right on your phone’s screen. Join Giznext’s WhatsApp channel and receive the industry-first tech updates.

Categories
Apps Featured How To

Exam Results: How To Check CBSE, ICSC, ISC, UPMSP Exam Results Via Digilocker App

Key Highlights

  • Digilocker is authorized app for personal ID and document storage
  • Is available on Android and iOS platforms
  • School and university exams can be checked online

Digilocker is the safest platform to keep all crucial identity documents. Authorised by the government of India, this mobile app allows storing personal IDs (Aadhaar card, driving licence), vehicle documents, etc. Digilocker is also offering services to check and download school and university results. And with the exam result season kickstarting, Digilocker is the safest bet to verify and download results directly from the issuing organisation/ authority. Be it class 10th and 12th CBSE or ICSE or ISC or UPMSP board results, you can easily see your exam results and also download it for future use.

For the tech geeks, stay updated with the latest cutting-edge gadgets in the market, exclusive tech updates, gadget reviews, and more right on your phone’s screen. Join Giznext’s WhatsApp channel and receive the industry-first tech updates.

Also Read: IRCTC Helicopter Reservations Begin For Char Dham Kedarnath Yatra 2025: Ticket Prices, How To Book

How To Check And Download Any Exam Result Using Digilocker Mobile App

Step 1: Download and install Digilocker app. You can download this app on both Android and iOS platforms.

Step 2: You can also access its desktop version by visiting www.digilocker.gov.in

Step 3: Login using valid credentials or register if you are a first time user.

Step 4: Scroll down on the hompage to the ‘Documents your might need’ section. Look for your ‘Class marksheet’. You will get multiple options for different exam results such as SSC, HSC, Class X, etc.

Step 5: Select the board of examination.

Step 6: Alternatively, tap on search and directly type in CBSE, ICSE, ICS or other board exam result.

Step 7: Enter student’s name, roll number, and year of exam.

Step 8: Tap on Get Document option

Step 9: The exam result with authorised signature will be issued which you can download as a PDF on your device.

Step 10: Get the print of the result if required

Categories
Apps Featured How To

Travelling Overseas? Here’s How To Activate International UPI On Gpay, PhonePe For Payments Abroad

Key Highlights

  • UPI apps have simplified digital money transactions
  • International payments now allowed via UPI apps
  • Steps listed below to activate international UPI

UPI (Unified Payments Interface) has been the game changer for the Indian citizens. The digital money transaction platform have simplified making/ receiving payments with bank linked phone number and dedicated apps. UPI services have been active in India for long now with frequent improvements enhancing the payment interface and overall security with digital money transactions. It’s even possible now to use popular UPI apps such as Google Pay and PhonePe overseas for payments. So, if you are travelling abroad and have to make some emergency payments, international UPI comes to your rescue. But how do you activate it? Well, in this guide we have shared the steps with which you can easily activate international UPI on Google Pay and PhonePe.

For the tech geeks, stay updated with the latest cutting-edge gadgets in the market, exclusive tech updates, gadget reviews, and more right on your phone’s screen. Join Giznext’s WhatsApp channel and receive the industry-first tech updates.

Also Read: Instagram Account Hacked? Immediate Steps To Take If Instagram Account Is Compromised

How To Activate International UPI On PhonePe

Step 1: Open PhonePe mobile app

Step 2: Tap on your profile icon placed on the top of the app’s homepage

Step 3: Scroll down and find the ‘Manage Payments’ option. Click it.

Step 4: Now, navigate to the ‘International’ option and tap on it.

Step 5: Select the ‘UPI International’ option. Currently, it is available for over 6 countries.

Step 6: Tap on the ‘Activate’ button in front of the bank account that you wish to activate for international payments.

Also Read: Enhance Your Daily Productivity: How To Pair Android Smartphones With Windows 11 PC, Laptop Without USB Cable

How To Activate International UPI In Google Pay

Step 1: Open Google Pay app on your smartphones

Step 2: Tap on the QR code scanner

Step 3: Scan the QR code of the international merchant

Step 4: You’ll get an option to enable international UPI. Activate it.

Step 5: Enter the amount you want to make as a payment. You will be shown the currency conversion rate as per the current date.

Step 6: Simply complete the payment by entering your UPI pin.