Categories
Apps Featured How To

Instagram Edits: New Standalone Editing Insta Tool? 10 Easy Steps To Use!

Key Highlights

  • Instagram launches standalone editing app called Edits
  • Introduced for both Android and iOS platforms
  • Allows editing videos for reels and more directly

Instagram has emerged as one of the most used platforms for social media engagement. It is one of those multimedia sharing apps where when can get as creative as they can with photo and video uploads. And to provide a consistent and diverse experience, new updates frequently makes way to this social media platform. A new feature rather a standalone app has now been introduced by Instagram that brings along a whole range of comprehensive editing tools for video/ photo editing and also monitoring performance of the uploaded content. What is this latest Instagram Edits app and how can you utilise it as a editing tool and a performance analyser simultaneously. We explain in this article:

For the tech geeks, stay updated with the latest cutting-edge gadgets in the market, exclusive tech updates, gadget reviews, and more right on your phone’s screen. Join Giznext’s WhatsApp channel and receive the industry-first tech updates.

Also Read: How To Use Instagram’s New Song Lyrics Feature In Reels: A Step-By-Step Guide

What Is Instagram’s Edit App?

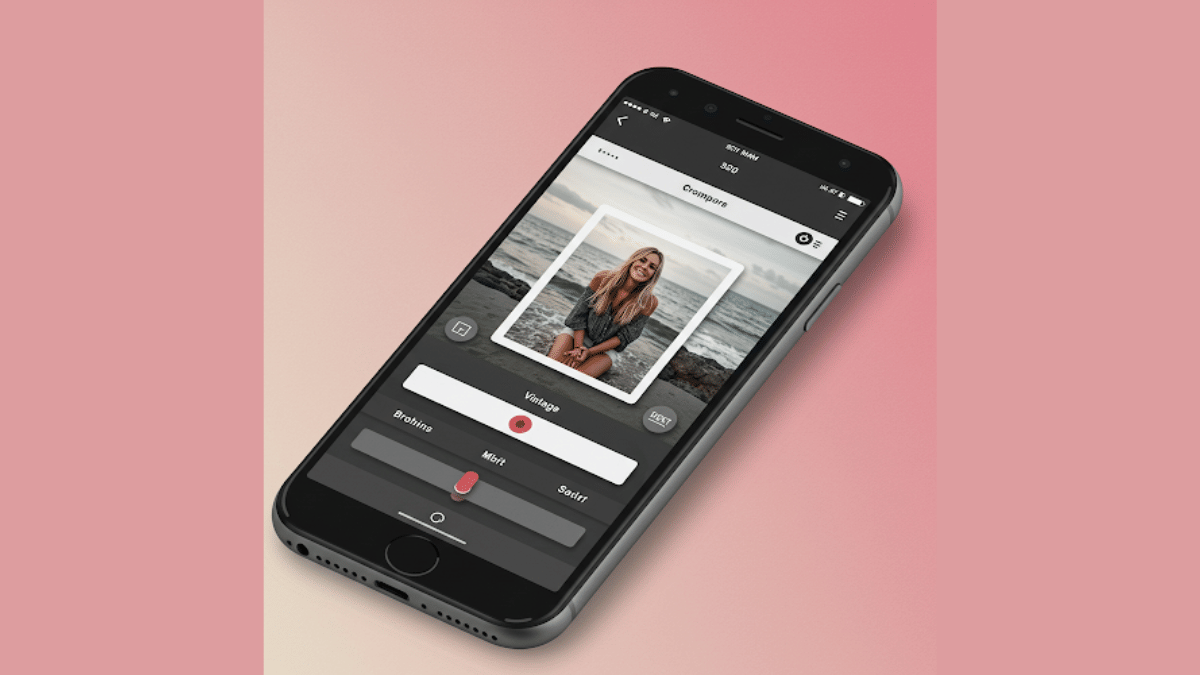
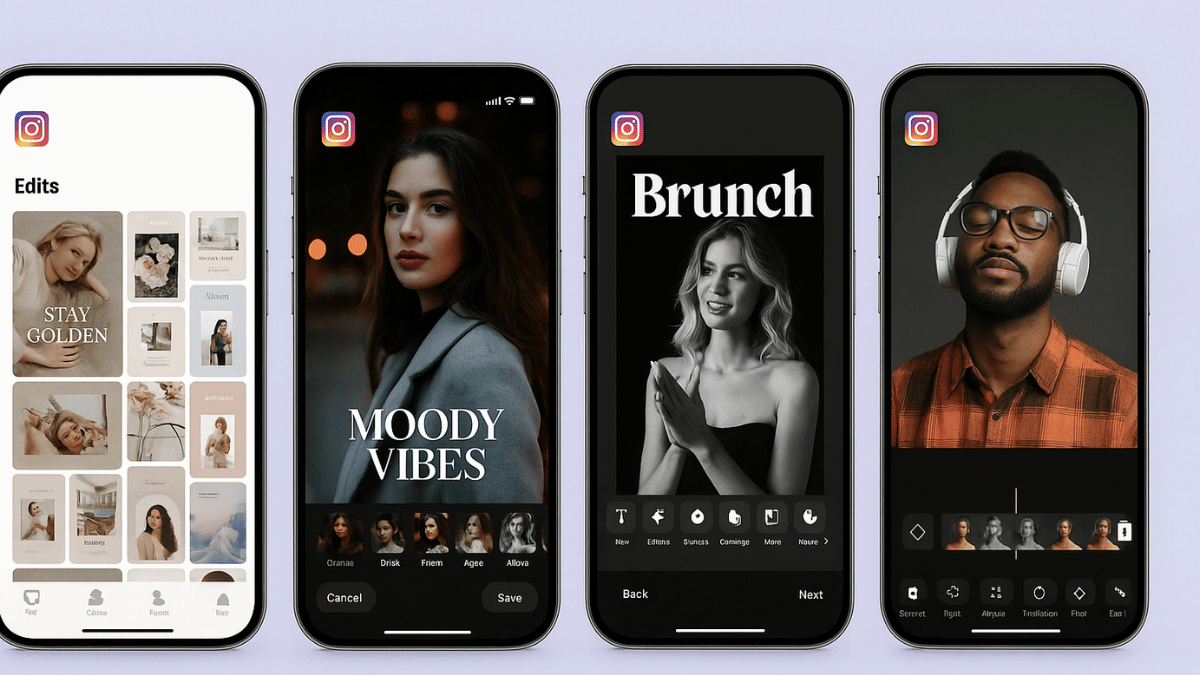
Instagram Edits is the latest Meta-developed app that has been designed to help content creators to improve their quality of content being uploaded on the platform. This AI-backed app brings along a host of features ranging from AI-backgrounds, green screen, sound and visual effects pre-set, and more.

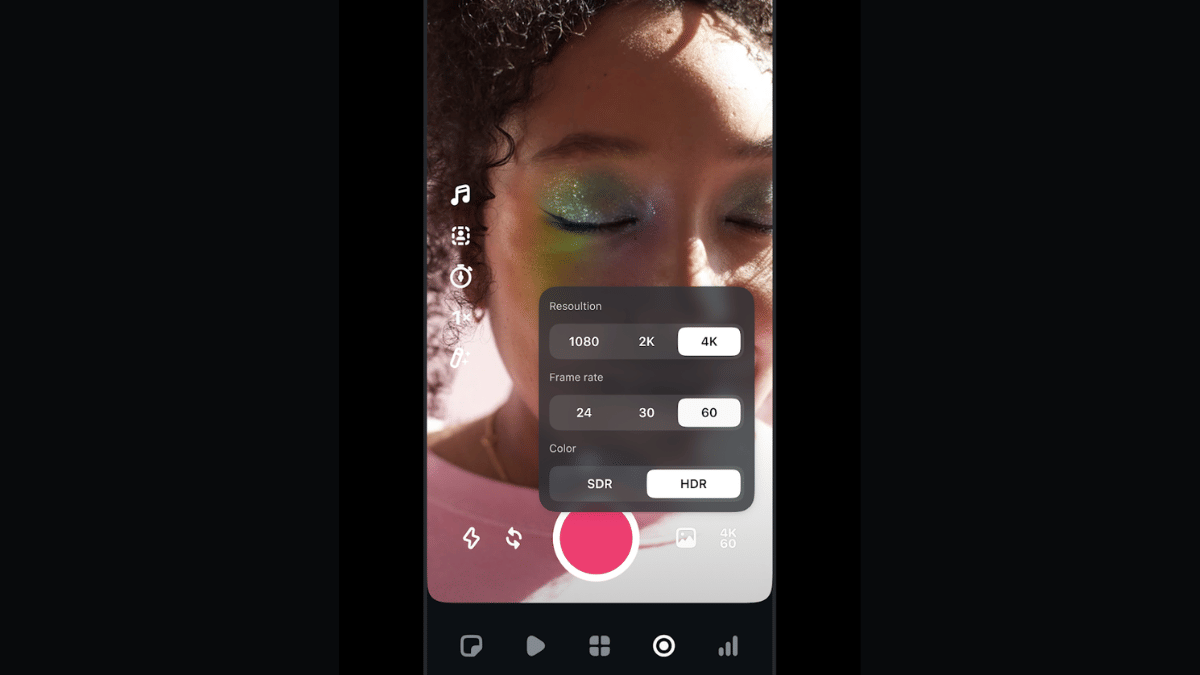
Instagram Edits will also allow users to remove background from a video and replace it with another in real time. Besides using pre-recorded footages from the gallery, Instagram Edits allows recording directly via the app where the videos can be recorded to up to 4K resolution@60fps. Edits currently supports shooting and recording videos of up to 10 mins.

Also Read: Instagram Top Hacks: How To Enable or Disable Sensitive Content From Home Feed

How To Download And Use Instagram Edits On Android and iOS

Step 1: Open Google Play Store or Apple App store on your smartphones

Step 2: Enter Instagram Edits in the search bar and tap on Install

Step 3: Open the Instagram Edits app

Step 4: Use your existing Instagram user ID and password to log-in

Step 5: To start a new project, tap on “+” icon.

Step 6: You can either import an existing video or image for the gallery or start a new recording. Tap on the capture icon for the latter.

Step 7: Toggle between the different lenses and apply if you want while recording a new clip

Step 8: Now, edit the video using AI-backgrounds, filters. You can also merge clips, use transition effects, add music, etc.

Step 9: Once done, tap on Export.

Step 10: You can share this edited video directly on Instagram and Facebook without switching the app.

Categories
Apps Featured How To

Want Free Delivery And Streaming? Here’s How To Join Amazon Prime On Mobile

Key Highlights

  • Sign up for Prime easily on your phone
  • Enjoy a 30-day free trial
  • Plans start at Rs. 299 per month

Are you someone who loves online shopping, binge-watching movies, or hunting for the best deals and discounts? If yes, then an Amazon Prime membership is something you should definitely consider. There are many benefits to Prime, including free delivery, Prime Video, and exclusive offers. Signing up is simple and quick, regardless of whether you’re using a desktop computer or a smartphone. To help you get started right now, here is a simple, step-by-step guide.

Also Read | How To Cancel Amazon Prime Subscription: See All Step Here

How To Install Amazon Prime On Your Smartphone

Signing up using your mobile is super simple. Just follow these steps:

Step 1: Open your mobile browser and go to Amazon Prime Page. This is where you’ll begin your Prime journey.

Step 2: Don’t have an Amazon account yet? Tap “Create Account”.

Step 3: Enter your password, name, and phone number. To get an OTP, tap “Verify mobile number.”

Step 4: If you’re an existing Amazon user, skip the account creation and simply log in with your details.

Step 5: Choose “Try Prime Free” after tapping the three-line menu.

Step 6: Press the “Start your 30-day free trial” button.

Step 7: Choose your Prime plan, confirm your billing and shipping details.

Step 8: You will be charged automatically when the trial period is up. If necessary, cancel at any moment.

For a better and faster shopping experience, download the Amazon app from your play store/ app store. It makes browsing, tracking, and shopping much easier.

Amazon Prime Membership Plans In India

Plan TypePrice
MonthlyRs. 299
3-Month PlanRs. 599
Annual PlanRs. 1,499

Also Read | Stay Safe While Shopping Online: Five Easy Tips To Avoid Getting Scammed

Why Prime Is Worth It

  • Many items come with free one- or two-day delivery
  • Special access to Prime-only offers and Lightning Deals
  • Prime Video and Prime Music streaming is unlimited
  • Prime Reading and gaming benefits

Whether you’re shopping, streaming, or saving, Prime has something for everyone.

For the tech geeks, stay updated with the latest cutting-edge gadgets in the market, exclusive tech updates, gadget reviews, and more right on your phone’s screen. Join Giznext’s WhatsApp channel and receive the industry-first tech updates.

Categories
Featured How To

Top 5 Effective Methods To Book Cheapest Flight Tickets In India In 2025

Key Highlights

  • Flight fares have become competitive in India
  • Dynamic pricing allows selecting cheaper flight tickets
  • Third-part apps for flight price comparison and booking available
  • Flexibility with travelling dates helps getting flight tickets at cheaper rates

India has witnessed a rapid growth in the domestic as well international air travel. And certainly, the demand for cheaper flight tickets is higher than ever. This has led to a competitive market for the flight operators in India where customers are being offered different schemes to avail cheaper air fares for both domestic as well international travels. Be it for your next business meeting or a vacation, you can book flights at much lower rates if you know the right tricks. Here in this guide, we are listing down the ways with which you can purchase flights tickets at cheaper rates than usual.

For the tech geeks, stay updated with the latest cutting-edge gadgets in the market, exclusive tech updates, gadget reviews, and more right on your phone’s screen. Join Giznext’s WhatsApp channel and receive the industry-first tech updates.

Also Read: Hate Standing In Long Queues: Here’s How To Book Indian Railways Platform Ticket Online

Method 1: Advance Booking Is The Best Trick

Booking air tickets in advance can help you get maximum benefits. And you don’t have to wait for any special festive season or other discount deals. Booking made mid-week also tends be be cheaper compared to weekend or week’s start.

  • Try making reservations within an average span of 6- 8 weeks prior your travel date
  • Book tickets for Tuesdays or Wednesdays as they are cheaper compared to the rest of the week

Also Read: Smart Travel Guide: How To Apply For And Get Indian Railways Ticket Refund Via IRCTC

Method 2: Flexibility With Travel Dates And Airport Location Helps

If you are flexible with your travel dates, you might find a better deal on your air tickets. Also, flight arrival and departure timings if selected appropriately can help you bag cheaper flight tickets for your next travel. Also, opting for nearby airports can work sometime.

  • Check for air fare pricing for different dates using flight ticket comparison sites and apps
  • Consider flying via Red-eye flights (ones that operate early morning or late night)
  • Skip you travel during peak season including festivals, school vacations, etc. Ticket prices can go higher in such scenarios.
  • Check connecting flight prices and compare rates for other nearby airports

Also Read: DigiYatra Tips And Tricks: How To Add Flight Boarding Pass For Hassle Free Travel

Method 3: Check And Book Flight Tickets Via Flight Comparison Websites And Apps

There are multiple such platforms online that compares flight tickets and also allows booking in advance. There are a bunch of popular travel websites and apps such as MakeMyTrip, Ixigo, GoIbibo, etc. that can help you compare flight ticket prices and make the reservations at cheaper rates. Google Flights, Skyscanner are other popular platforms for the same.

Also Read: Vacation Planning Guide: 5 Effective Ways To Make Use Of AI For Travel Planning In 2025

Method 4: Skip Add-Ons Or Upgrades

You can opt-out of any add-ons to cut down on the higher flight ticket costs. Making bookings via low-cost carriers such as IndiGo airlines and Air India Express can also do the trick.

  • Avoid taking extra add-ons such as seat upgrade, travel insurance, and meals (if it’s a short flight).
  • Try carrying light luggage to avoid additional check-in luggage fees

Also Read: List Of Best Instagram Hashtags For Travellers

Method 5: Use Coupon Codes, Reward Points/ Air Miles, etc.

This is another solid trick that bets you get cheaper air tickets. Often airlines announces discounts on ticket prices to boost sale. Try taking advantage of such promotional offers. Also, most of the airlines provide reward points or air miles to frequent travellers which can be used to book cheaper flight tickets.

Categories
Apps Featured How To

Exam Results: How To Check CBSE, ICSC, ISC, UPMSP Exam Results Via Digilocker App

Key Highlights

  • Digilocker is authorized app for personal ID and document storage
  • Is available on Android and iOS platforms
  • School and university exams can be checked online

Digilocker is the safest platform to keep all crucial identity documents. Authorised by the government of India, this mobile app allows storing personal IDs (Aadhaar card, driving licence), vehicle documents, etc. Digilocker is also offering services to check and download school and university results. And with the exam result season kickstarting, Digilocker is the safest bet to verify and download results directly from the issuing organisation/ authority. Be it class 10th and 12th CBSE or ICSE or ISC or UPMSP board results, you can easily see your exam results and also download it for future use.

For the tech geeks, stay updated with the latest cutting-edge gadgets in the market, exclusive tech updates, gadget reviews, and more right on your phone’s screen. Join Giznext’s WhatsApp channel and receive the industry-first tech updates.

Also Read: IRCTC Helicopter Reservations Begin For Char Dham Kedarnath Yatra 2025: Ticket Prices, How To Book

How To Check And Download Any Exam Result Using Digilocker Mobile App

Step 1: Download and install Digilocker app. You can download this app on both Android and iOS platforms.

Step 2: You can also access its desktop version by visiting www.digilocker.gov.in

Step 3: Login using valid credentials or register if you are a first time user.

Step 4: Scroll down on the hompage to the ‘Documents your might need’ section. Look for your ‘Class marksheet’. You will get multiple options for different exam results such as SSC, HSC, Class X, etc.

Step 5: Select the board of examination.

Step 6: Alternatively, tap on search and directly type in CBSE, ICSE, ICS or other board exam result.

Step 7: Enter student’s name, roll number, and year of exam.

Step 8: Tap on Get Document option

Step 9: The exam result with authorised signature will be issued which you can download as a PDF on your device.

Step 10: Get the print of the result if required

Categories
Apps Featured How To

Travelling Overseas? Here’s How To Activate International UPI On Gpay, PhonePe For Payments Abroad

Key Highlights

  • UPI apps have simplified digital money transactions
  • International payments now allowed via UPI apps
  • Steps listed below to activate international UPI

UPI (Unified Payments Interface) has been the game changer for the Indian citizens. The digital money transaction platform have simplified making/ receiving payments with bank linked phone number and dedicated apps. UPI services have been active in India for long now with frequent improvements enhancing the payment interface and overall security with digital money transactions. It’s even possible now to use popular UPI apps such as Google Pay and PhonePe overseas for payments. So, if you are travelling abroad and have to make some emergency payments, international UPI comes to your rescue. But how do you activate it? Well, in this guide we have shared the steps with which you can easily activate international UPI on Google Pay and PhonePe.

For the tech geeks, stay updated with the latest cutting-edge gadgets in the market, exclusive tech updates, gadget reviews, and more right on your phone’s screen. Join Giznext’s WhatsApp channel and receive the industry-first tech updates.

Also Read: Instagram Account Hacked? Immediate Steps To Take If Instagram Account Is Compromised

How To Activate International UPI On PhonePe

Step 1: Open PhonePe mobile app

Step 2: Tap on your profile icon placed on the top of the app’s homepage

Step 3: Scroll down and find the ‘Manage Payments’ option. Click it.

Step 4: Now, navigate to the ‘International’ option and tap on it.

Step 5: Select the ‘UPI International’ option. Currently, it is available for over 6 countries.

Step 6: Tap on the ‘Activate’ button in front of the bank account that you wish to activate for international payments.

Also Read: Enhance Your Daily Productivity: How To Pair Android Smartphones With Windows 11 PC, Laptop Without USB Cable

How To Activate International UPI In Google Pay

Step 1: Open Google Pay app on your smartphones

Step 2: Tap on the QR code scanner

Step 3: Scan the QR code of the international merchant

Step 4: You’ll get an option to enable international UPI. Activate it.

Step 5: Enter the amount you want to make as a payment. You will be shown the currency conversion rate as per the current date.

Step 6: Simply complete the payment by entering your UPI pin.

Categories
Featured How To

Smart Travel Guide: How To Apply For And Get Indian Railways Ticket Refund Via IRCTC

Key Highlights

  • Railway ticket cancellation can be done online
  • Refund eligible for tickets cancelled before chart preparation
  • Up to Rs. 120 minimum cancellation charges

India has one of the largest railways network globally which is growing connecting more cities and villages. Over the years, Indian railways has adapted to the modern technologies and is now providing better services in a bid to cut down long queues at ticket counters. Making train reservations online helps you to plan your journey well ahead. And in case of any emergencies, you can also cancel your tickets online and get a refund. Indian railways has designed a hassle free ticket cancellation and refund process via IRCTC portal. Here in this guide, we have shared the steps that can help you cancel your railways ticket and apply for refunds in case of cancelled or delayed trains.

For the tech geeks, stay updated with the latest cutting-edge gadgets in the market, exclusive tech updates, gadget reviews, and more right on your phone’s screen. Join Giznext’s WhatsApp channel and receive the industry-first tech updates.

Also Read: WhatsApp Advanced Chat Privacy: How To Add Extra Safety Layer For WhatsApp Chats?

How To Cancel Railway Tickets Via IRCTC Online

Step 1: Open IRCTC mobile app or website

Step 2: Login with your registered user ID/ password or mobile number

Step 3: Navigate to Transactions section (mobile app) or My Bookings (website)

Step 4: From the list of upcoming bookings, select the ticket that you want to cancel

Step 5: Scroll down and select ‘Cancel Ticket’ option

Step 6: Verify the details before cancelling.

Step 7: Refund amount will be displayed on the screen which will include cancellation charges if applicable.

Step 8: Once the refund process is initiated, money will be transferred back to the original source within 5 to 7 working business days.

Also Read: Hate Standing In Long Queues: Here’s How To Book Indian Railways Platform Ticket Online

Criteria And Cancellation Charges For Railways Refund

Cancellation Charges Criteria
Rs. 120 If ticket’s cancelled 48 hours prior train departure
25% of base ticket price (minimum Rupees 120)If ticket’s cancelled before 12 hours of train departure
50% of base ticket price (minimum Rupees 120)4 hours before chat preparation or train departure (whichever is first)
Till departure of train No refund
After train departure No refund

Categories
Apps Featured How To

WhatsApp Advanced Chat Privacy: How To Add Extra Safety Layer For WhatsApp Chats?

Key Highlights

  • WhatsApp chats are backed by end-to-end encryption safety
  • New advanced safety layer added called ‘Advanced Chat Privacy’
  • Can be enabled manually on mobile app

WhatsApp has been stepping up its privacy game ever since its launch. Despite being based on an end-to-end encryption platform, WhatsApp has been constantly upgrading its ecosystem with advanced safety and privacy features. The instant messaging app has received another new feature that will be providing advanced safety to all chats and media messages with a single chat or group. What is this new advanced chat privacy feature and how can you enable this feature:

For the tech geeks, stay updated with the latest cutting-edge gadgets in the market, exclusive tech updates, gadget reviews, and more right on your phone’s screen. Join Giznext’s WhatsApp channel and receive the industry-first tech updates.

Also Read: WhatsApp Advanced Privacy Hack: How To Share WhatsApp Profile Without Giving Out Your Mobile Number

WhatsApp Advanced Chat Privacy: What Is It?

WhatsApp has released a new privacy feature called the Advanced Chat Privacy to make conversations more secure and private. This feature has been in works for a while and was spotted via leaks. This new feature will act like an advanced safety layer for your chats where any random person won’t be able to export your chats or media without your knowledge.

The Advanced Chat Privacy feature will also restrict auto-download of media files and also AI tool plug-ins stopping Meta AI features in the selected chats. Advanced Chat Privacy feature on WhatsApp can be enabled with just a few taps on the mobile app. Let’s take a look at the steps below:

Also Read: Telegram Tips And Tricks: How To Schedule Messages On Telegram Android, iOS App

Steps To Enable Advanced Chat Privacy Feature On WhatsApp

Step 1: Open WhatsApp mobile app

Step 2: Go to the single or group chat where you want to enable the Advanced Chat Privacy feature

Step 3: Click on the chat name (from the top)

Step 4: Tap on Advanced Chat Privacy feature to enable it

That’s it, your chats have now been protected by an additional safety layer.

Categories
Featured How To

How To Add EPF Nominee Via Official Online Portal: Step-By-Step Guide

Key Highlights

  • Adding EPF nominee is crucial for account holders
  • Allows seamless money transfers and enhances financial security
  • Nominee can be added online via EPFO platform
  • Any family member can be added as a nominee in EPFO

EPF (Employee Provident Fund) is one of the most beneficial services available for the taxpayers in India. Managing and accessing all EPF services is now easier with the official website. Updating profile, linking aadhaar, and much more can be done via EPFO website. Adding nominee is one of such crucial procedure that you should complete if haven’t already. You can add a family member as a nominee to receive funds and more. In this guide, we are sharing the steps to add a family member or your spouse as a nominee to your EPF account.

For the tech geeks, stay updated with the latest cutting-edge gadgets in the market, exclusive tech updates, gadget reviews, and more right on your phone’s screen. Join Giznext’s WhatsApp channel and receive the industry-first tech updates.

Also Read: How To Use Telegram Without Internet? Top 5 Working Tricks In 2025

Steps To Add Family Member/ Spouse As EPF Nominee

Step 1: Open any web browser on visit the official EPFO website.

Step 2: Tap on the Services tab

Step 3: Select “For Employees” option

Step 4: Tap on the “Member UAN/Online Service

Step 5: Login to your UAN account using your credentials

Step 6: Click on the Manage tab from the menu option

Step 7: From the drop down, select “E-nomination”

Step 8: In the Family Details section, add the nominee details such as nominee’s full name, addhaar card, etc.

Step 9: Add multiple family members if required

Step 10: If you have added multiple nominees, mention the percentage share that will be divided between both.

Step 11: Click Save

Step 12: Once the details are verified, an OTP will be sent to your registered mobile number

Step 13: Tap on E-sign option

Step 14: Now, enter the OTP to complete the nominee add process.

Also Read: Three Effective Ways To Restore Deleted Games And Apps On Windows 11 Laptops And PC: How To Guide

What Documents You Need To Add EPF Nominee?

  • Nominee’s date of birth as per official records
  • Nominee’s Aadhaar number for verification
  • Proof of relation as per EPFO records

Also Read: Hacked Instagram Account? Don’t Worry! Instagram To Help Regain Hacked Account Access Easily

Who Can Be Added As EPF Nominee?

  • Father
  • Mother
  • Spouse
  • Kids
  • Any depended family membet
Categories
Apps Featured How To

Netflix Rolls Out Dialogue-Only Subtitles: Here’s How To Use The New Feature

Key Highlights

  • Netflix adds dialogue-only subtitles
  • Available in many languages
  • Easy to enable in subtitle settings

Netflix has introduced a brand-new feature to make watching shows and movies with subtitles much smoother and more focused. The platform now offers dialogue-only subtitles, starting with season five of its popular thriller series You. This new setting removes background audio cues and speaker names, showing only what’s being said by the characters.

This update is great news for viewers who prefer a cleaner screen while still needing subtitles. Until now, subtitles on Netflix came with extra details like ‘phone buzzing’ or ‘knock on the door’, meant for those with hearing difficulties. While helpful for some, these cues could be distracting for others who just want to follow the conversation. Let’s explore its features and how it works.

Also Read | How To Use Netflix Game Controller iOS App

What’s New With Netflix Subtitles?

  • Only Spoken Dialogue: The new subtitle option displays only what the characters are saying, no sound effects or speaker labels.
  • Multiple Languages Supported: Dialogue-only subtitles are not limited to English. They are also available in languages like French, Italian, Spanish, Brazilian Portuguese, and more.
  • Two Subtitle Options Now Available: Dialogue-only subtitles and subtitles with audio cues
  • Language Labels Made Simple: English: Dialogue-only subtitles, English (CC): Subtitles with audio cues and speaker names

How To Turn On Dialogue-Only Subtitles On Netflix

Want to try this new feature? Here’s how to use it:

Step 1: On your laptop, smartphone, or smart TV, launch Netflix app.

Step 2: Choose a Netflix original title like You Season 5 or any new release.

Step 3: Tap the Play button.

Step 4: Select the option for Audio & Subtitles.

Step 5: On the right, select the language without (CC). For example, choose ‘English’ instead of ‘English (CC)’.

Step 6: Press Back to resume viewing with clearer subtitles.

Also Read | Netflix Moments: What Is It? How To Capture And Share Screenshots?

This small but useful update gives viewers more control over how they watch. Whether you find audio cues distracting or just want to focus on the dialogue, Netflix now gives you that choice. This update is already live on new Netflix Originals and is expected to roll out more widely soon.

For the tech geeks, stay updated with the latest cutting-edge gadgets in the market, exclusive tech updates, gadget reviews, and more right on your phone’s screen. Join Giznext’s WhatsApp channel and receive the industry-first tech updates.

Categories
Featured How To Laptop

Laptop Overheating Issues: Top 5 Quick Fix To Keep Laptop Temperatures Stable

Key Highlights

  • Laptop overheating a common issue
  • Increased temperatures can hamper laptop’s speed and overall performance
  • Dust and dirt, extensive usage, battery degradation common reasons

Soaring summer temperatures is something that affects both human and machines. Increased workloads often leads to machines break down due to high temperatures with continuous operations. The same applies to laptop and PCs where extensive usage in peak summers can lead to frequent crashes, app shutdowns, and more. Excessive heat can even lead to damages further affecting the performance of your laptop. If you already are experiencing frequent laptop heat up and shut down issues due to the same, here’s the guide to fix this issue. We have listed top 5 effective methods that can help you fix laptop heat up issues without paying a visit to service centre.

For the tech geeks, stay updated with the latest cutting-edge gadgets in the market, exclusive tech updates, gadget reviews, and more right on your phone’s screen. Join Giznext’s WhatsApp channel and receive the industry-first tech update.

Also Read: Android Auto Customization: How To Change Wallpaper With And Without Smartphone

Top Effective Methods To Protect Laptop From Overheating

Method 1: Restrict App Running In Background (Extensive or Heavy apps)

Try to keep all the unused apps and software closed when not in use. Closing down unnecessary apps running in the background not only ensure swift performance but also keep your laptop’s temperature steady. It is one of the effective ways to ensure the laptop doesn’t get heated up with continuous usage.

Also Read: Asus ZenBook S13 OLED Laptop Review: A Compact Beast Machine!

Method 2: Use A Laptop Stand Or A Cooling Pad

Try using laptop with a cooling pad or a stand. You can buy a USB-powered cooling pad if your laptop usage is extensive. These pads and stands allows with a lifted placement of the laptop which further helps with proper airflow to keep the temperatures stable. These stands and cooling pads are ideal for extensive gaming and similar tasks that requires heavy processing.

Also Read: ASUS ZenBook S 14 OLED Laptop Review: Efficient Productive Notebook

Method 3: Keep AirVents Clean From Dust

Often clogged air vents of a laptop also leads to increased temperatures. Hence, it is advised to keep your laptop’s vents clean to allow proper air flow. Also, try using laptop on a flat hard surface instead of your lap, bed, or blankets for long. Doing this can block the air vents and the air flow hampering speeds and overall performance.

Also Read: Windows 11 Tips And Tricks: How To Change, Reset Old Password In Windows 11-Powered Laptops/ PCs?

Method 4: Ensure All Apps And Software Are Updated To Latest Version

Older OS and software versions can also lead to laptop overheating. Downloading the latest updates ensure your device doesn’t lag with performance and also maintain stable temperature levels.

Also Read: How To Use Telegram Without Internet? Top 5 Working Tricks In 2025

Method 5: Uninstall Unnecessary Apps And Softwares

Remove or uninstall any app of software which is not in use. Specifically, if the app size is large and it takes up extra storage space. Also, try setting up and using your laptop in a cool room to keep the components functioning well.

Also Read: How To Remove An Image Background On Windows 11

Laptop Overheating Common Signs:

If your laptop is experiencing overheating issues, you will notice the following changes:

  • Abrupt laptop shutdown or restart
  • Laggy performance
  • Frequent app crashes
  • Extreme heat generating through the laptop’s bottom
  • Error messages on screen
  • Slow app launch speeds
  • Loud fan noise or fan continuously operating