Categories
Apps Featured How To

WhatsApp Introduces Document Scanning: Here’s How To Use It

Key Highlights

  • WhatsApp adds document scanning for iPhones
  • New Party Popper emoji for celebrations
  • Android rollout coming soon

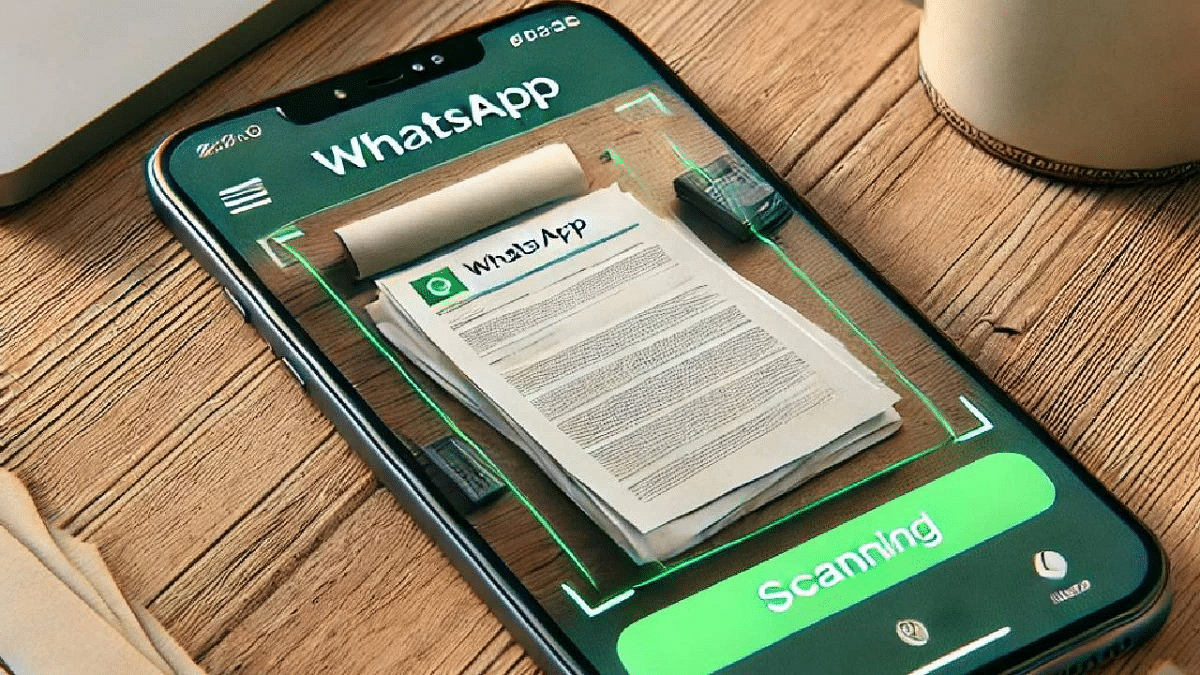
WhatsApp has made sharing documents even easier with its new document scanning feature. Currently available for iPhone users with the latest iOS update, this feature lets you scan documents directly through the app without relying on third-party apps. Alongside, WhatsApp has introduced a festive Party Popper emoji reaction for all users.

Also Read | Say Goodbye To Phone Numbers: WhatsApp Web To Offer Usernames Soon

WhatsApp Document Scanning Feature: How To Use

You can now scan documents seamlessly using WhatsApp. Follow these simple steps:

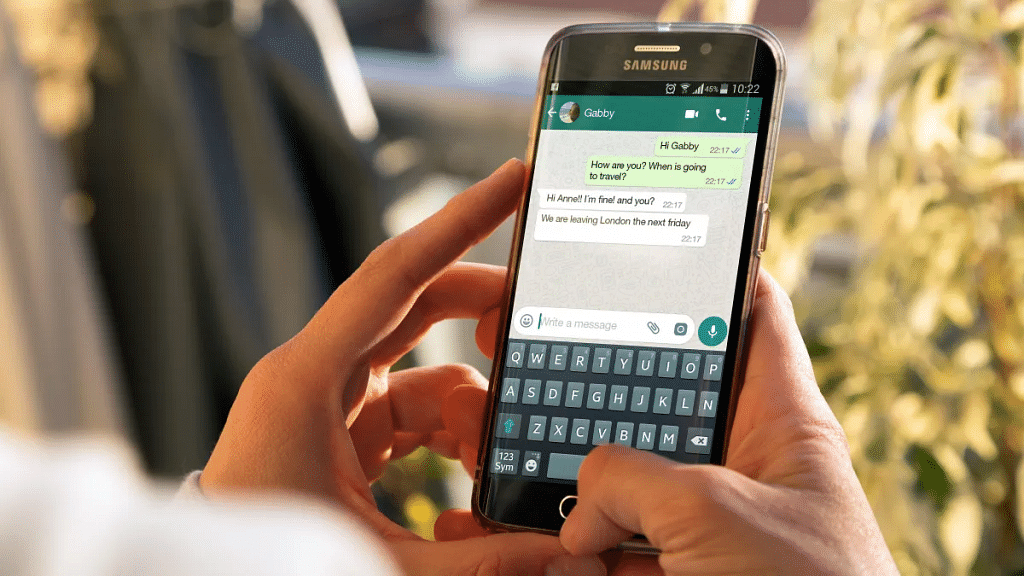
Step 1: Launch WhatsApp and go to any personal chat or group.

Step 2: Tap on the attachment (paperclip) icon and choose the ‘Document’ option.

Step 3: From the options, pick ‘Scan Document.’ Your phone’s camera will activate.

Step 4: Position the document in the camera frame. WhatsApp automatically detects the edges and suggests cropping margins.

Step 5: You can manually adjust the margins to ensure accuracy. Review the scanned document and make any necessary edits.

Step 6: Once satisfied, you can either share the scanned document in the chat or save it for later use.

Availability

Currently, the scanning feature is limited to iPhone users with the latest iOS update. The rollout is gradual, so it may take time to reach all users. There’s no confirmation yet on when it will arrive for Android.

Also Read | WhatsApp AI Tips And Tricks: How Can You Create And Edit Animated AI Images In WhatsApp

New Reaction Emoji: Party Popper

WhatsApp has also rolled out a festive Party Popper emoji reaction. This seventh reaction emoji is available to both iOS and Android users, joining the existing six options:

  • Thumbs Up
  • Heart
  • Crying with Laughter
  • Shocked Face
  • Sad Face
  • High Five

The Party Popper emoji is perfect for celebrating birthdays, achievements, or any festive occasion, adding a cheerful touch to your chats.

For the tech geeks, stay updated with the latest cutting-edge gadgets in the market, exclusive tech updates, gadget reviews, and more right on your phone’s screen. Join Giznext’s WhatsApp channel and receive the industry-first tech updates.

Categories
Apps Featured How To

ChatGPT Maps Feature: Here’s How To Explore Local Spots Easily

Key Highlights

  • Find local businesses and restaurants easily
  • Get real-time info and view maps
  • Chat for more details on locations

ChatGPT’s search feature has now included maps and real-time location-based results. Users can now find shops, restaurants, and more with the most recent information thanks to this latest feature. Here’s a quick tutorial on how to use the desktop and mobile versions of ChatGPT’s Search Maps features.

Also Read | ChatGPT Search Quick Hacks: How To Use ChatGPT As Default Search Engine In Google Chrome

Simple Steps To Use ChatGPT Search Map features

ChatGPT

Step 1: To get started, make sure you have a ChatGPT account. If you’re already signed in, open the ChatGPT app on your mobile device or the desktop version on your computer.

Step 2: ChatGPT Search is available for all users, meaning you don’t need a premium subscription like ChatGPT Plus to use it. Once you’re in the app, you can start using the search feature right away.

  • On mobile: Open the app and tap the search bar.
  • On desktop: Make use of the top of the screen search bar.

Step 3: If you prefer using ChatGPT as your main search engine, you can set it as your default browser. This is a handy way to access AI-powered search results more easily.

Step 4: One of the latest features added to ChatGPT Search is the ability to search for businesses, restaurants, and locations using a map.

  • Enter a company name or location in the search bar.
  • ChatGPT will display relevant results with an interactive map.
  • You can tap on the results for more detailed information like hours of operation, reviews, and directions.

Step 5: If you’re looking for specific local information, such as nearby restaurants or stores, simply type your query, and ChatGPT will show you up-to-date results on the map.

For example, you can search for “restaurants near me” or “best coffee shops in Delhi.” ChatGPT will display a list of options with pins on the map.

Step 6: Once you’ve found a business or location you’re interested in, you can ask ChatGPT more about it. For example:

  • “Tell me about this restaurant’s review.”
  • “How do I get to this store?”

ChatGPT will provide details and answer your questions using the latest information.

Also Read | ChatGPT’s Advanced Voice Mode Lands On The Web: Here’s How To Use

Advanced Voice Mode Coming Soon

You will soon be able to speak your search queries with ChatGPT’s Advanced Voice Mode. This feature that will further improve your search experience will be available in the upcoming week.

For the tech geeks, stay updated with the latest cutting-edge gadgets in the market, exclusive tech updates, gadget reviews, and more right on your phone’s screen. Join Giznext’s WhatsApp channel and receive the industry-first tech updates.

Categories
Apps Featured How To

Relive Your Best Moments Of 2024 With Instagram’s Year In Review: Here’s How

Key Highlights

  • Create personalized year-end stories with Instagram’s new feature
  • Add music, text, and effects to make your recap creative
  • Available until the first week of January 2024

Instagram has unveiled an exciting new feature to wrap up the year: Personalized Year in Review Stories. This End-of-Year (EOY) Collage feature lets users showcase their favorite posts and memories from 2024. Available until the first week of January, this update makes it easy to create stunning recaps of the year with added music, text, and creative templates.

Also Read | Apple App Store Awards 2024: Apps And Games That Dominated This Year

How To Use Instagram’s Year in Review Feature

Follow these simple steps to create your personalized year-end recap:

Step 1: Launch the Instagram app on your smartphone.

Step 2: Locate the “+” button at the bottom of your screen.

Step 3: From the options, choose the “Reel” feature to proceed.

Step 4: Browse through various year-end templates designed to highlight your best 2024 moments.

Step 5: Add Your Favorite Photos and Posts

Step 6: Follow the app’s instructions to upload photos, posts, or specific moments from the year.

Step 7: Personalize your recap by adding music, text, filters, and other effects.

Step 8: Once satisfied, share your year-in-review reel or story with friends, family, and followers.

Also Read | Year In Search: Here’s What India Googled In 2024

Why Use This Feature?

This new addition allows users to reflect on the past year creatively and expressively. With music, text, and filters, your recap becomes a vibrant story showcasing the moments that mattered most. Don’t miss out, start curating your year-end memories today.

For the tech geeks, stay updated with the latest cutting-edge gadgets in the market, exclusive tech updates, gadget reviews, and more right on your phone’s screen. Join Giznext’s WhatsApp channel and receive the industry-first tech updates.

Categories
Apps Featured How To

Spotify Wrapped Is Here: Here’s How To See What You Loved In 2024

Key Highlights

  • Spotify Wrapped 2024 is here with personalized music stats
  • Includes new AI podcast and enhanced playlists
  • Access on the app or web and share your highlights

It’s that time of year again! Spotify Wrapped 2024 is here. It provides a customized recap of your preferred songs, musicians, and podcasts. With innovative new features like AI-powered podcasts and updated tools for an interactive experience, this year’s wrapped is more than just a summary, it’s a celebration. Here’s all you need to know.

Also Read | Not Sure How To Start A Podcast On Spotify? Here’s Your Step-by-Step Guide

What’s New In Spotify Wrapped 2024

  • AI Podcast with Google’s NotebookLM: In an interesting discussion format, listen to an AI podcast that analyzes your musical preferences and highlights your favorite genres, artists, and songs.
  • Improved AI DJ and Playlists: Wrapped-specific changes give Spotify’s AI DJ feature a new twist and provide an unprecedentedly curated experience.

How To Access Spotify Wrapped 2024

Step 1: Open the Spotify app, tap the Wrapped bubble, and dive into a 14-part story of your musical year.

Step 2: Visit spotify.com/wrapped to view your recap on your browser.

Key Highlights Of Wrapped Story

  • Total minutes streamed, favorite tracks, and top genres are all featured.
  • Add the Your Top Songs 2024 playlist to your library and relive your top hits anytime.
  • Discover your most-listened-to podcasts and total time spent with them.
  • Enjoy a mini podcast from AI hosts discussing your year in music.

Share The Fun

Spotify provides shareable slides and a personalized card summarizing your stats. Share them easily on social media or save for later.

Also Read | Learning On Spotify? This Music Streaming App Testing Video-based Courses

How To Find Old Wrapped Playlists

Old Wrapped stories are only available temporarily, but you can find saved playlists by searching “Wrapped” or “Your Top Songs” in the Spotify app or website.

This year’s Spotify Wrapped isn’t just about looking back, it’s about celebrating your unique musical tastes in a creative and interactive way. Explore it now and enjoy the nostalgia.

For the tech geeks, stay updated with the latest cutting-edge gadgets in the market, exclusive tech updates, gadget reviews, and more right on your phone’s screen. Join Giznext’s WhatsApp channel and receive the industry-first tech updates.

Categories
Apps Featured How To

Truecaller Tips & Tricks: Check Steps To Turn Off Last Seen Feature On Android

Key Highlights

  • Truecaller is the most downloaded caller ID app on Android
  • Has over 500 million downloads on Google Play Store
  • Can filter out telemarketing and spam calls

Truecaller is one of the popular Caller ID and spam prevention apps that has over 500 million downloads worldwide. The messaging app filters out telemarketers, spam, and other unwanted calls to manage all of your calls and messages promptly. It maintains a community-based spam list that is updated by almost all users across the world.

Truecaller also records when a user was ‘last seen.’ With this feature, other users will be able to see when a certain user last used the application. It was WhatsApp that first introduced this feature when it was acquired by Facebook. It has been criticized by many and also has been favored by many. If enabled, the ‘Last Seen’ feature displays the most recent activity of the users on the app.

Now, Truecaller which allows users to look up individuals who have registered with their mobile phones also has the “Last Seen” feature in the app. In this article, we will help you learn how to hide last seen on your Android phone in Truecaller.

Also Read | Incoming Call Not Showing On iPhone? How To Fix Caller ID Incoming Call Issue On iPhone?

How To Hide Last Seen In Truecaller

Step 1: Open the Truecaller app on your Android phone.

Step 2: You will see a burger icon on the top left side, tap on that.

Step 3: From a list of options, click on ‘Settings’.

Step 4: Under the Settings, you will get all the options that we need to change Truecaller behaviors. Tap on the option ‘Privacy Center’.

Also Read | How To Disable the ‘This Call Is Now Being Recorded’ Warning On OnePlus

Step 5: At the front of the ‘Availability’ option, tap on the toggle button. When the toggle button is ON, it shows other Truecaller users whether a user is busy during phone caller or their phone is on Silent mode.

Step 6: Turn it off and other users will not be able to see your Last call activity of yours.

Anyone using Truecaller who has the “Last Seen” feature enabled can see when you were last active. Since the app is always running in the background, last seen in this case refers to the most recent time you were actively using your phone. The only circumstances in which the other party cannot view your most recent details are when they are not using Truecaller or have turned off the feature.

For the tech geeks, stay updated with the latest cutting-edge gadgets in the market, exclusive tech updates, gadget reviews, and more right on your phone’s screen. Join Giznext’s WhatsApp channel and receive the industry-first tech updates.

Categories
Featured How To Info

How To Update Bank Account Details In EPFO: Step By Step Guide

Key Highlights

  • Provident fund services can be accessed online
  • EPFO website helps with all PF-related services
  • Bank account must be updated accurately for the funds

EPFO (Employee Provident Fund Organization) is the government regulatory board that facilitates and manages all the pension/ insurance schemes for the Indian citizens. This organization is widely offering its services online on its official website (EPFO) ranging from PF balance check to update bank account and other profile details. Updating your accurate records on the EPFO portal ensures you get all the timely benefits. And when we speak of the records, they include personal details such as bank accounts, phone number, address, and others. In one of our previous articles, we guided you with the steps to check the PF balance with and without the UAN number. And in this article, we are sharing the guide to update bank account details on the EPFO website.

For the tech geeks, stay updated with the latest cutting-edge gadgets in the market, exclusive tech updates, gadget reviews, and more right on your phone’s screen. Join Giznext’s WhatsApp channel and receive the industry-first tech update.

Steps To Update Bank Account In EPFO Website

Step 1: Open EPFO official website. You can also click on this link to visit EPFO directly.

Step 2: Go to the Services tab and select “For Employees”

Step 3: Click on the ‘Members Passbook’ option

Step 4: A new page will open up. Sign-in using your verified credentials

Step 5: Select the KYC tab from the dropdown menu

Step 6: Now, select your bank and enter the primary details such as bank account number, name, and IFSC code.

Step 7: Tap on save.

Once you perform all of the above steps, a request will be sent to the EPFO officials for verifications. You bank account will be updated once the request is approved from the officials.

Categories
Apps Featured How To

Instagram Tips And Tricks: How To Earn Money Through Posts

Key Highlights

  • Instagram users earn money by sharing creative images
  • With the right strategies, you can turn Instagram into a profitable platform
  • This post offers tips to help you get started

You’ve probably heard stories of Instagram users making money off the images they upload and share on a regular basis. Now, you might be wondering how Instagram users generate money. Can you too manage it on your own? Well, as long as you use some lovely and creative images, you can attract the interest of Instagram’s millions of users and get paid. You may be thinking about where to begin. Right? In this post, we’ll look at a few strategies you can use right away to become one of the many prosperous businesspeople who profit from Instagram. Let’s get started.

Also Read | Instagram Tips To Create The Best Bio For Boys

How To Make Money On Instagram?

Become An Influencer

You can use your Instagram page to promote a variety of products from all different industries if you can get the much sought-after influencer status. Influencers and brands often work together to create sponsored posts promoting the brand’s products. You must increase your Instagram following and consistently provide content that engages your followers strongly if you want to get to this position.

Join An Affiliate Program

This is related to brand partnerships, as joining an affiliate program requires connecting yourself to a business that sells specific products or experiences. Affiliate programs basically pay you to sell other people’s products. When a follower buys something from your brand through you usually through a specific link or discount code, you are paid.

Sell Your Castoffs

Perhaps you don’t have a business to advertise, but you frequently sell your used clothing and accessories online. Instagram can expand your customer base. Include as much information as possible in your captions while showing clothing and other items, and take attractive photos of them. It is important to consider the age, size, condition, and brand of each item. If you’re trying to sell a specific item, link to the specific item in your Instagram bio. The hashtag #shopmycloset is popular among Instagram vendors.

Also Read | Instagram Tips And Tricks: How To Reply To Any Reel Comment With Another Reel Video On Android, iOS

Earn Badges Through Live Videos

When you share live videos on Instagram using the Live feature, you can earn money straight from your audience. Viewers can purchase badges to show support when you showcase your abilities, goods, and other items. Instagram Badges are available for $0.99 (approximately Rs. 73), $1.99 (about Rs. 147), and $4.99 (roughly Rs. 370). You will see heart symbols next to the comments from the people who have purchased them.

For the tech geeks, stay updated with the latest cutting-edge gadgets in the market, exclusive tech updates, gadget reviews, and more right on your phone’s screen. Join Giznext’s WhatsApp channel and receive the industry-first tech updates.

Categories
Apps Featured How To

Google Maps Hidden Tricks: How To Measure Elevation Of Any Location Using Google Maps

Key Highlights

  • Google Maps is the go to mobile application for navigation
  • Maps can be used on both smartphones and desktop (PC/ laptop)
  • One can measure elevation of a location
  • No need to separately visit Google Earth for elevation measurements

Google Maps is the most advanced navigation app you get to use on your modern gadgets including smartphones, tablets, laptops, and PCs. This app has evolved to be more powerful by borrowing some of the features that are offered by the Google Earth. Measuring elevation of any location is one of such options which allows Google Maps to stay ahead in the race of navigation apps available on Android and iOS ecosystem.

This feature comes as a treat for all the outdoor enthusiasts who are always keen on known more about a new destination. Specifically, if you are up on the hills, measuring the elevation is one of the coolest features to access on Google Maps. And the steps aren’t tricky. You just need to follow a simple procedure that will help you with getting the elevation of the location you are at or are searching for. Take a look below:

For the tech geeks, stay updated with the latest cutting-edge gadgets in the market, exclusive tech updates, gadget reviews, and more right on your phone’s screen. Join Giznext’s WhatsApp channel and receive the industry-first tech update.

Also Read: How To Add A Link To Your Instagram Stories: A Step-By-Step Guide

Steps To Check Elevation Of Any Location Using Google Maps On Android, iOS

Step 1: Open the Google Maps app on your respective devices

Step 2: Enter the name of the location in the search bar whose elevation you need to search

Step 3: Now, tap on the Layers icon

Step 4: Select the “Terrain” option

Step 5: Once this option is toggled on, you’ll see a different layout on the Maps screen highlight the topography and elevation of the selected location

Step 6: Zoom into the specific location whose elevation you need to check

Step 7: You will be able to see the elevation lines and the measurement. Make sure you don’t zoom in completely otherwise the elevation measurements won’t show up.

Categories
Featured How To

How To Check Your EPF (Employee Provident Fund) Balance With And Without UAN Number

Key Highlights

  • Checking PF balance online is a hassle free process
  • Registration required on EPFO portal
  • Missed call and SMS service also available to check PF balance

For the salaried individuals, Indian government is offering multiple schemes and programs for wealth and health services. EPFO (Employees’ Provident Fund Organization) is one of the such government bodies which is established to keep a check and regulate/manage provident funds of the Indian citizens. An employee provident fund (EPF) is essentially a long term saving scheme which is offered by the Indian government helping the masses to save funds for a better life post retirement. For all PF related services, employees and employers can visit the EPFO website and login using their credentials. One of the most commonly used services on the EPFO portal is the PF balance check. If you are struggling to know your PF balance then this article has the step by step guide to help you with the same.

For the tech geeks, stay updated with the latest cutting-edge gadgets in the market, exclusive tech updates, gadget reviews, and more right on your phone’s screen. Join Giznext’s WhatsApp channel and receive the industry-first tech update.

Also Read: How To Add A Link To Your Instagram Stories: A Step-By-Step Guide

Steps To Check PF (Provident Fund) Balance With UAN Number

Step 1: On a web browser, launch the EPFO website

Step 2: Click on the Services tab

Step 3: Tap on the “For Employees” tab

Step 4: Scroll down and locate the “Service Menu”

Step 5: Click on the “Member Passbook” option

Step 6: A new page will open up. Enter your UAN number and password to login

Step 7: You will get an OTP on the registered mobile number. Use it to login to the EPF Passbook page.

Step 8: You will see the PF balance on the screen.

Step 9: Tap on Download if you wish to save the details

Also Read: Call Barring On Android And iOS: Here’s How To Enable It To Block Spams/ Scam Calls And Enhance Privacy

How To Check PF Balance Without UAN Number

If you don’t have your UAN number handy, you can also check the PF balance with your registered mobile number. All you need to do is give a missed call on a dedicated mobile number or send an SMS.

Step 1: Open the dialer app on your smartphones

Step 2: Ensure you are using the registered mobile number for the miss call.

Step 3: Make a call on 9966044425

Step 4: Once the call disconnects automatically, you’ll get all the PF details via SMS.

Categories
Apps Featured How To

How To Add A Link To Your Instagram Stories: A Step-By-Step Guide

Key Highlights

  • Swipe-up links were limited to users with 10K+ followers
  • Now, all users can add links using ‘Link Stickers’
  • Link Stickers make sharing easier and clickable

Sharing links on Instagram Stories can be challenging and ineffective because they are not clickable. To see what the Instagram user posting intends to share on their posts, one can only hope that the viewers would remember the link or type it out.

Instagram users can now add links to any section of the story displayed on the screen. Earlier, users with more than 10,000 followers on Instagram were the only ones who could link stories by using the swipe-up feature. Now, all Instagram users can use ‘Link Stickers’ to add a link to their stories since that restriction has been lifted.

Also Read | Are You A Plant Lover? Here Are The 100 Best Instagram Names For Gardeners

Steps To Add A Link To Your Instagram Story

Step 1: Open Instagram.

Step 2: Click on the camera icon on the left side of the screen or swipe left to open the camera.

Step 3: Choose an old photo from your gallery or take a brand-new photograph.

Step 4: You can also choose a post from another Instagram account to share on your story.

Step 5: Viewers of your story will be able to see the posts if they are public.

Step 6: Once you have a photo for your story, click the paperclip or link symbol at the top of the screen.

Step 7: Select the Link sticker which appears on your menu.

Step 8: Copy the link you wish to use in your story from its original location.

Step 9: In the Link sticker, paste the URL of the website you want to link to.

Step 10: Tap the sticker to see other color combinations.

Step 11: To save it, press Done. Your viewers will now be able to click on the link.

Also Read | Instagram Tips And Tricks: How To Improve Message Quality Using Meta AI Voice Conversation

Steps To Add A Link To Your Instagram Bio

You can also include a permanent link in your Bio if you want users to be able to access it anytime they browse your profile. The following steps can help you know how you can add a link to your Bio:

Step 1: Open Instagram and go to your profile by tapping on your profile image in the lower right.

Step 2: Tap on Edit Profile.

Step 3: In the empty website section, paste the link you want to use.

Step 4: Select Save. That’s all.

For the tech geeks, stay updated with the latest cutting-edge gadgets in the market, exclusive tech updates, gadget reviews, and more right on your phone’s screen. Join Giznext’s WhatsApp channel and receive the industry-first tech updates.