Categories
How To

Here’s How To Pre-Book JioPhone Next: See All Steps

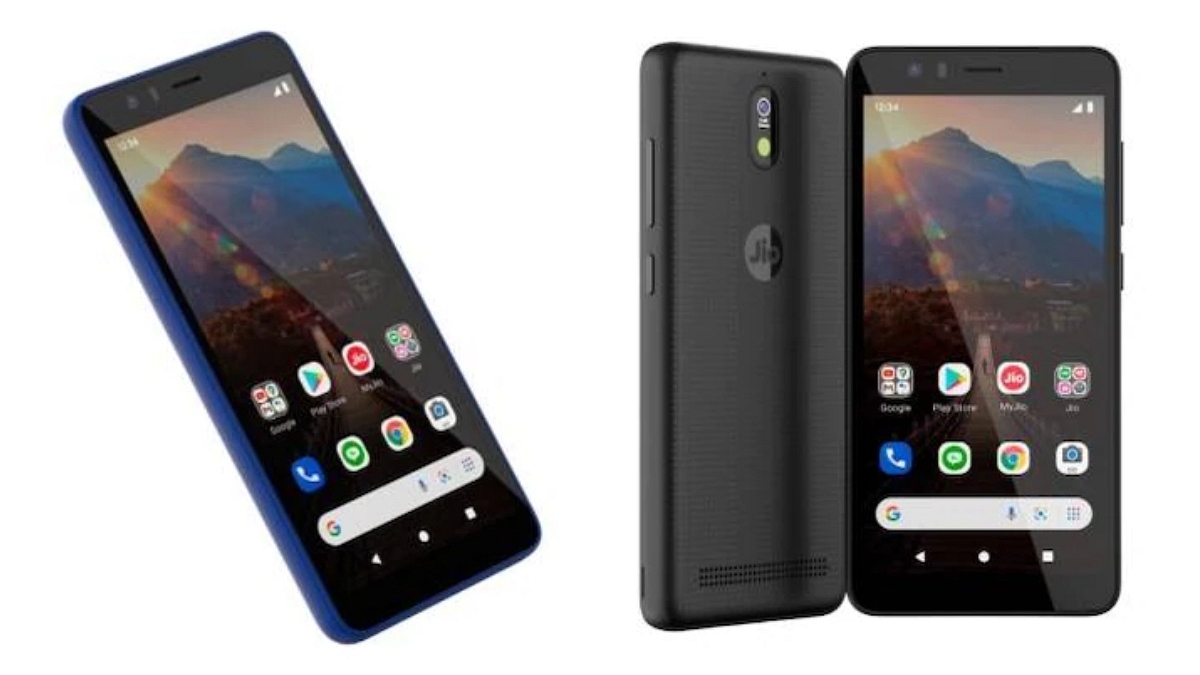
The much-awaited smartphone JioPhone Next is finally available for sale. Notably, the device was developed under the partnership between India’s largest telecom operator and tech giant Google. The JioPhone next is priced at Rs. 6,499; however, buyers are allowed to purchase the device with EMI options. The JioPhone Next is available for pre-booking, but before buying the device you should know about the steps to purchase the device.

Steps To Pre-Book JioPhone Next

Step 1: First, you have to send a Hi message to the mobile number 7018270182. Then, the chatbot of India’s largest telecom operator Reliance Jio will register your interest to pre-book the device.

Step 2: Now, you have to follow all the steps to pre-book the JioPhone Next. After that, you will get a confirmation from the company. You are also allowed to visit JioMart to get the device. Besides, you can pre-book the device via the JioMart Digital store or on Jio.com.

JioPhone Next Specifications

The JioPhone Next comes with a Pragati OS, 5.45-inch HD+ (720×1,440 pixels) display, Corning Gorilla Glass 3 protection along with an anti-fingerprint coating. It has a 13MP rear camera and an 8MP camera for selfies. In addition, the rear camera supports preloaded custom augmented reality features, night mode, portrait mode.

The device is powered by the 1.3GHz Qualcomm Snapdragon 215 quad-core processor. It has 2GB of RAM and 32GB of storage that can be increased to 512GB. In addition, the smartphone comes with a 3,500mAh battery, dual-SIM (Nano) slots, 3.5mm audio jack, Bluetooth v4.1, Wi-Fi, and Micro-USB port.

Additionally, there are several sensors, such as a light sensor, proximity sensor, and accelerometer. Also, the device comes with software updates, Live Translate, Google Assistant support, and Read Aloud features.

JioPhone Next Price And Offers

It is worth noting that the device is priced at Rs. 6,499. However, if you are looking for EMI options, then you have to pay Rs. 1,999 initially along with Rs. 501 processing fees. Furthermore, the company said that it has joined hands with 30,000 retail outlets in India to provide access to JioPhone Next. The device is also available on digital financing options so that all buyers can purchase the JioPhone Next.
Categories
How To

How To Send Diwali Stickers On WhatsApp And Instagram: Check All Steps Here

After launching new features for web and mobile versions, WhatsApp has launched animated stickers for its users. These newly launched stickers will allow you to send Diwali wishes in a different and better way without wasting more time looking for the stickers.

“To add to the festive cheer and make the exchange of messages more expressive, emotive, and fun, WhatsApp has curated a fun and colourful Diwali sticker pack. There is something for everyone and these Diwali stickers on WhatsApp are sure to make festive message exchange with friends and family even more exciting,” the company said.

Notably, the new stickers are on the application and all users are allowed to download the stickers and use the stickers. However, to use the newly launched animated stickers, you have to follow these steps.

Steps To Download WhatsApp Stickers

Step 1: First, you need to open the chat, where you want to send the animated stickers. Now, you have to tap on the smiley icon and choose the sticker you want to send. ( iOS users can find the stickers on the right side of the text bar. On the other hand, Android users can locate the stickers icon is next to the GIF option).

Step 2: Click on the Plus section and start looking for the Happy Diwali stickers pack. In case you are unable to find the stickers, then you have to click on this link. After that, you have to open the same chat again and send animated stickers.

Diwali Stickers On Instagram

Meanwhile, Instagram has also launched new three Diwali stickers on its platform. However, to use the stickers users, have to follow these steps. Here are some steps to help you to send stickers to their family and friends.

First, users have to upload a picture to the story, then you have to search for stickers on the toolbar. After that, you will see the Diwali stickers in the same section. Now, you have to place the stickers on the story and you are allowed to publish the story.

Categories
How To

WhatsApp Web: Here’s How To Use WhatsApp Web On Computer And Laptop

WhatsApp is an instant messaging app, which allows users to receive images, audio, and video calls. The messaging app is compatible with Opera, Google Chrome, Safari, and Firefox browser.

The messaging application can be accessed on mobile phones, laptops, and PCs. WhatsApp is very to use on all platforms, but still, if you are looking for ways to operate the app via laptop and PCs, then you need to follow these steps.

How Are All Steps To Use WhatsApp Web On Computer/ Laptop

Step 1: To use WhatsApp services, you need to open a browser on the computer and search for web.whatsapp.com.

Step 2: After that, you will see the QR code, which you have to scan from your device.

Step 3: Android phone users have to open WhatsApp on their phone and click on the three dots and on the WhatsApp Web option.

Step 4: iPhone users have to click on the settings option and choose WhatsApp web/desktop.

Step 5: Then, you will be directed to your mobile camera, so that you can scan the QR code. Now, you have to point your phone camera at the laptop or the computer screen to scan the code.

Step 6: You can use WhatsApp Web in the browser and you can continue to use it until and unless you log out from the app, from the computer, or phone.

How To Install WhatsApp Web On Computer

Step 1: You have to install the WhatsApp Web desktop application on a PC.

Step 2: Tap on the download option and install the same application on the system. On a Windows computer, you have to follow all steps. But, you have to the app icon to the folder.

Step 3: Now, you can start the WhatsApp desktop application.

How To Make Call From WhatsApp Web

It is worth noting that there is no option of making video and audio calls via WhatsApp Web. Currently, you are allowed to receive images, videos, audio, messages, and more. Some reports claim that the company is planning to add this feature on the web, but there is nothing on the same yet.

On the other hand, if you are still looking for ways to make video calls from the app, then you have to open WhatsWeb and log in to your account. Now, you have to click on the three dots and select Create a Room option. You will receive a message saying continue in messenger, then Facebook will allow you to create a room via name. Tap on the Create Room option and start the video call. Now, you can share the video link with your friends and others.

Categories
How To

How To Fix App Download Issue On Your Phones

Android users frequently report being of app downloading issue from the Google Play Store. While in most of the cases an error code is generated, some issues are completely random. Are you experiencing issues with app downloading on your Android smartphones? Here are a few alternatives to fix the problem:

Inspect Your Connection And Storage Space

The first and the most fundamental thing you should do is make sure you have a reliable internet connection and enough storage space. If you’re on Wifi, go to mobile data and retry the download. Disable your VPN as well, as this could be obstructing your download.

Force Stop app, Clear Cache And Data

Giving Play Store a fresh start can help with a variety of issues, including app download failures. Follow the instructions given below:-

Go to Settings, and then find Apps & Notifications > Notifications. View all apps and go to the App Info page on the Google Play Store.

Force a stop and see if the problem is rectified.If it doesn’t work, clear your cache and data, then reopen the Play Store and try the download again. Other operations facilitated by Google Play Services and Download Manager are now used by the Google Play Store.

If you’re still having problems with the Play Store after cleaning its data, try clearing the cache and data for Google Play services, Google Services Framework, and Download Manager.

Try To Uninstall/ Reinstall Your Updates

If you cannot download apps after clearing the cache and data of the Play Store and Services, delete the Play Store updates and reinstall them.

To reinstall you have to go to the Apps & Notifications menu and select Google Play Store from the list, then hit the three dots in the top right corner and select Uninstall Updates. When prompted, tap OK to confirm.

This will return the Play Store app to older version, removing any bugs or difficulties that may have been tagged along with the new uodates. However, by side-loading the APK from APK Mirror, you may now upgrade it to the latest version.

Logout From Your Google Account

If nothing else works, you might try logging out and re-login from your Google account to your device.

To Remove Google Account:-

On your Android phone, go to Settings.

Then, access your accounts Remove Account (you may be prompted to enter your phone’s pin or password) after selecting the account you want to delete.

To Login Back To your Google Accounts:-

Navigate to the Accounts section of Settings. Select Google from the Add Account menu.

To add the account, enter your email address and password, then follow the on-screen instructions.Now open the Play Store, pick your account from the sidebar dropdown menu, and try the download again.

Apps Won’t download On A Freshly Set-up Phone

If you have done a factory reset or are setting up a new device, there is a good chance that new apps won’t install at all. For everything in the queue, the Play Store will say “waiting download” in this situation.

This is due to the fact that your Google Account is in sync mode or that you are downloading the apps associated with the account. So simply wait for the sync or download to finish before trying again.

You can speed things up by disabling account data sync in settings for a minute or two and then enabling it again. You should have a stable internet connection.

Conclusion

So that was a quick tutorial on how to fix the Google Play Store error of being unable to download apps. As is obvious, clearing cache and data for Google Play Store, Play Services, and Download Manager is the general remedy for the app download issue.

If the issue persists, you may need to uninstall Play Store updates or remove and re-add your Google account. In certain circumstances, a quick restart may be enough to clear things up.

Categories
How To

How To Schedule Auto Power On/ Off On Your Smartphone

You may occasionally need to turn off your phone, perhaps for a conference or to conserve battery, and then you will certainly want to turn it back on. However, you cannot do this every time you go to a meeting or go to sleep, and you may even forget to turn it back on after turning it off.

As a remedy, some firms now include an auto power on/off option in their phones. What about other phones, though? Don’t worry, we will show you how to plan auto power on/off on Android today.

Using In-Built Option

In most devices, auto power on/off may be enabled by going to the settings and looking for the feature. Many phones with custom skins include the feature, including OPPO, Vivo, and Xiaomi. Follow the instructions given below to enable the auto power on/off setting on your smartphone:-

Access Your Settings

Here you can look for scheduled power on/off or Auto power on/off mode. The feature is usually present in the additional settings of an OPPO smartphone.

Select the feature and set the power-on and power-off timings on the next page. You can also choose the days on which this action will be repeated. When you have completed all of these steps, tap the Done button to activate this feature.

Setting Auto Power On/Off In Android Nougat Phones

This feature is also built into Android Nougat smartphones. Here’s how to turn on/off auto power in Android Nougat phones:-

Go to Settings> Advanced, and then Scheduled Power On/Off. Enable the toggles for power on and power off, and then set a time for power on/off. That is all there is to it.

Downloading an Application For Using Auto Power On/Off Mode

There are several free apps on the Play Store that will allow you to do this, but some of them will require your phone to be rooted. So, now we have to utilize the Power Schedule app that doesn’t require root and can works with older Android versions.

After downloading or installing the app, launch it and grant it the permissions it requires. After that, pick “Add event” and fill in the details of your event, such as the time you want your phone to switch off. Add an event to turn it off in the same way. If you need to repeat this action, you can also choose the days. Select “Done” from the drop-down menu.

That’s all there is to it! Your phone will now turn off at the specified time and then turn back on automatically. Furthermore, the app allows you to schedule certain features such as turning on/off WiFi or Bluetooth at a specific time or any other app.

Final Thoughts

These were some options for turning on and off your Android’s auto power. On your Android, you may now schedule SMS text messages. Do you have any similar functions on your smartphone, if you do not you can use these remedies mentioned in this article to use the auto power on/off feature.

Categories
How To

Here’s How To Install Google Assistant On JioPhone?

Reliance Jio is all set to launch its much-awaited smartphone near Diwali this year, but still, its JioPhone is really popular amongst feature phone users. In fact, the company claims that more than 100 crores users are using JioPhone in the country.

The JioPhone is one of the best feature phones in the country as it comes with the Google Assistant feature. The Google Assistant feature on JioPhone is available in English and Hindi. However, to use the Google Assistant feature on JioPhone, you have to follow these steps.

Here’s How To Get Google Assistant On JioPhone

Step 1: To get the Google Assistant on JioPhone, you have to update the phone first.

Step 2: You need to go to the setting, then the device, and then the software update option. Now, you’ll see some changes in the feature and Google Assistant icon available on the app list, and it is done.

Google Remove Some Features KaiOS

It is worth noting that KaiOS that comes with JioPhone has recently lost some of the important features. For the unaware, the platform has stopped providing Virtual Assistant features from Google, which means JioPhone users are not allowed to call and message via voice commands.

Notably, users can call and send the message manually. “Due to recent changes implemented by Google, feature phones running on KaiOS will experience limited functionality with Google Assistant. Calling and sending SMS messages to your contacts using Google Assistant is no longer supported. Other Google Assistant features currently work as normal,” the company said.

JioPhone Specifications

The 4G JioPhone comes with a Nano-SIM slot that works on the Jio network. It has a 2.4-inch display, dual-core processor, and 512MB of RAM. Furthermore, the device comes with 4GB of internal storage that can be increased up to 128GB. The feature phone runs KaiOS and comes with all Jio apps. In addition, there is a Google Assistant feature without calling and texting feature.

Please share your valuable comments in the section below. Also, join our GizNext Tech Enthusiast Telegram group and GizNext Tech Enthusiast WhatsApp group via smartphones. 

Categories
How To

Amazon Prime Membership: Here’s How To Get It Free

Amazon is all set to increase its tariffs plans in India. The company has already revised its monthly, quarterly, and annual plans, which are costlier than previous packs. So, in that case, if you are looking for ways to access Amazon Prime Membership for free, then you should look at these packs.

Reliance Jio Packs For Amazon Prime Membership

Reliance Jio offers Amazon Prime membership with postpaid plans. These packs will cost you Rs. 399, Rs. 599, Rs. 799, Rs. 999, and Rs. 1,499. These plans are providing 75GB, 100GB, 150GB, 200GB, and 300GB of data per month. Besides, users are getting unlimited calling, 100 messages per day, Amazon Prime membership, and Jio app access.

The other postpaid plans also offer content from leading apps such as Netflix, Disney+ Hotstar, and Amazon Prime membership. It offers in-house Jio apps access for the same period. In addition, the telecom operator has started providing family addition connections with Rs. 599, Rs. 799, and Rs. 999 plans.

Reliance JioFiber Plans For Amazon Prime Membership

JioFiber offers Amazon Prime with five packs that are priced at Rs. 999, Rs. 1,499, Rs. 2,499, Rs. 3,999, and Rs. 8,499 packs respectively. These packs will offer 150 Mbps, 300 Mbps, 500 Mbps, and 1 Gbps speed. In addition, JioFiber packs are providing content from Amazon Prime, Disney+ Hotstar, and more apps.

Vodafone-Idea Packs With Amazon Prime Membership

Just like Reliance Jio, Vodafone-Idea is providing Amazon Prime Membership with Postpaid plans. These packs will cost you Rs. 499, Rs. 699, and Rs. 1,099. The Rs. 499 pack offers Amazon Prime access for one year, 75GB of data, Netflix, Disney+ Hotstar, 100 SMS/Month, and 200GB rollover data facility. The other two packs ship unlimited calling and content from almost all leading OTT apps.

Airtel Packs For Amazon Prime Membership And Mobile Edition

Airtel is providing Amazon Prime with two prepaid plans that are priced at Rs. 131 and Rs. 349 packs. In addition, the company Prime Mobile edition with several packs, such as Rs. 89, Rs. 129, Rs. 149 Rs. 199, Rs. 219, Rs. 249, Rs. 298, Rs. 299, Rs. 379, Rs. 399, Rs. 456, Rs. 499, Rs. 558, Rs. 598, Rs. 698, Rs. 699, Rs. 1,498, and Rs. 2,498 respectively.

Categories
How To

Here’s How To Get Netflix For Free With Airtel, Vi, And Reliance Jio

Even though several OTT companies started their operations in India, Netflix is still one of the popular platforms. The company offers four plans in the country that are priced at Rs. 199, Rs. 499, Rs. 649, and Rs. 799.

Private telecom operators, such as Airtel, Vi (Vodafone-Idea), and Reliance Jio, launched several packs to provide content benefit from the leading content app. So, in case you are looking for ways to get Netflix access free from these plans, then you should check the below-mentioned packs.

Reliance Jio Packs Postpaid And Prepaid Packs For Netflix

It is important to note that Reliance Jio offers Netflix access with all postpaid plans that will cost you Rs. 399, Rs. 599, Rs. 799, Rs. 999, and Rs. 1,499 respectively.

Similarly, Reliance Jio offers Netflix services with its JioFiber plans that are already listed on the official website. Notably, JioFiber plans are priced at Rs. 1,499, Rs. 2,499, Rs. 3,999, and Rs. 8,499 respectively.

Extra Benefits With Reliance Jio Postpaid Plans

These packs offer 75GB, 100GB, 150GB, 200GB, and 300GB of data. In addition, these packs ship unlimited calling, Amazon Prime, Disney+ Hotstar, free messages per day,

Additional Benefits With JioFiber Packs

Apart from Netflix, these packs offer unlimited calling, Amazon Prime video, Disney+ Hotstar, Voot Select, SonyLiv, Zee5, Voot Kids, Sun NXT, Hoichoi, Lionsgate Play, Discovery+ JioCinema, ShemarooMe, Eros Now, ALT Balaji, and Saavn. These packs include 3.3TB of data.

Vi (Vodafone-Idea) Postpaid And Prepaid Plans For Netflix

Vodafone-Idea does not provide Netflix with prepaid plans, but still, the telecom operator offers similar benefits with postpaid packs that are available for Rs. 1,099, Rs. 1,699, and Rs. 2,299.

These packs offer Netflix access for one year, Amazon Prime, Disney+ Hotstar Mobile, Vi Movies & TV VIP subscription, unlimited data, free messages per day, and an international roaming pack.

Airtel Postpaid And Prepaid Packs For Netflix

Notably, Airtel does not offer Netflix access with its prepaid, postpaid, and internet plans.

Kindly share your valuable comments in the section below. Please join our GizNext Tech Enthusiast Telegram group and GizNext Tech Enthusiast WhatsApp group via smartphones. 

Categories
How To Tech News

How to set Custom Ringtone in iPhone

Despite the fact that the iPhone has been around for a long time, there is still no straightforward way to create a custom ringtone, but it is doable. You can make your own ringtones with iTunes if you don’t want to buy them or utilize the ones that come with your iPhone.

With iTunes 12.7, the procedure can be altered slightly. Although the previously synced “Tones” library has been gone, you can still manually install ringtone files on your iPhone.

Step 1: Getting Itunes

With a recent iPhone, you hardly ever need to utilize iTunes. But if you want to install your own custom ringtones, you have to get iTunes first.

On a Windows PC, you’ll need to download and install the most recent version of Apple’s iTunes.If you have a Mac, iTunes generally comes pre-installed. This method will work on both a Mac and a Windows PC.

However, iTunes for macOS Catalina is no longer available from Apple.

Step 2: Choose a Desired Sound File

You’ll need a sound clip to convert and use as a ringtone for this. You most likely already have an idea of what you’d like to use. If not, go ahead and look for anything that interests you. You are free to use any sound file you come across.

  • The length of your ringtone file must not exceed 40 seconds. Ringtones that are longer than 40 seconds will not be copied to your phone by iTunes.
  • If the file is long and you only want to use a portion of it, you can use an audio editor to chop it down to the desired length. You are free to use any audio editor you like. 
  • You can visit mp3cut.net to cut your audio files. To utilize this website, go to the “Open file” tab and select the MP3 or other sound file you want to modify. If you submit video files, it can also extract the sound from them.

Step 3: Convert MP3 to AAC format

It’s likely that your audio file is in MP3 format. To use it as a ringtone, you’ll need to convert it to AAC format. (You can skip this step if your sound file is already in AAC format or has a .m4r extension.)

  • To begin, open iTunes and add the sound file to your library. This can be accomplished by simply dragging and dropping the file into the iTunes library. After that, look for the file under Library > Songs.
  • In iTunes, go to File > Convert > Create AAC Version and choose the sound file.

Step 4: Renaming Your File

  • In your iTunes library, you’ll have two copies of the same song file: the original MP3 version and the new AAC version.
  • To keep track of which is which, right-click on the library’s headings and select the “Kind” column from the drop-down menu.
  • A new “Kind” column will appear, indicating which file is which. The original MP3 is the “MPEG audio file,” while the “AAC audio file” is your new AAC file. If you choose, you can remove the MPEG audio file version (which is the MP3) from your collection by right-clicking on it.
  • You now have an AAC file for your ringtone. However, you must modify the file extension in order for iTunes to recognize it as a ringtone.
  • To begin, drag and drop the AAC file from your iTunes library to your Desktop or any other location on your computer.
  • The ringtone will be delivered as an AAC file with the.m4a extension. Replace the .m4a extension with.m4r. If the file’s name is Song.m4a, for example, rename it to Song.m4r.

Step 5: Adding Ringtone to your Phone

Finally, use the provided USB-to-Lightning cable to connect your iPhone to your PC or Mac.

  • If you haven’t previously connected your phone to iTunes on that PC or Mac, unlock your iPhone and hit the “Trust” option on its screen to confirm your file transfer. You’ll be asked to enter your PIN code.
  • In iTunes, select the device icon to the left of “Library” in the menu bar.
  • In the left sidebar, click the “Tones” box under  My Device.
  • Drag the.m4r ringtone file from its folder into the iTunes Tones section.
  • The ringtone will be synced to your phone via iTunes and will appear under Tones here right away.

Conclusion

Listen to any music you like. You can follow the above-mentioned steps to set any customized audio file as your ringtone on your iPhone.

Categories
How To Tech News

How to Check IMEI Number in Mobile using Code, Android, and Settings

You may be asked for your IMEI number when registering your phone or trying to sell an old one online. Don’t worry if you’re stumped and urgently attempting to figure out what this number is. 

What is the IMEI number?

Every mobile phone sold through legitimate channels is granted a unique number known as the IMEI (International Mobile Station Equipment Identity). This number will come in handy if you misplace your phone or it is stolen. When reporting your phone as stolen, the police usually ask for the IMEI number, and depending on local legislation, your phone’s IMEI can be blacklisted, preventing it from connecting to networks or making calls.

Due to the fact that an IMEI is linked to a specific SIM slot, dual SIM phones will have two IMEI numbers. Tablets with cellular connectivity will have an IMEI number as well.

This makes the number crucial in an emergency. If the device is found, the IMEI number can be used to verify that it is genuinely your phone. 

Checking your Phone’s IMEI Number Using USSD Code

This is the most straightforward technique of determining your phone’s IMEI number. The advantage of this strategy is that it is almost universal. It works on practically all feature phones and smartphones, so give it a shot before looking for your phone’s bill.

  • On your phone, dial *#06#.
  • On the screen, the IMEI number will now appear. You should either write it down somewhere secure or snap a screenshot.

Checking IMEI Number on your Phone

For iPhones

The IMEI is also inscribed on the back panel of an iPhone 5 or any other subsequent iPhone. Simply flip the phone over to record it. The IMEI is printed on the SIM tray on iPhone 4s and any other previous iPhones.

For Android

  • Use the Google account associated with the Android phone to access Google Dashboard.
  • Next to the green robot logo, select Android.
  • This will provide a list of all devices associated with the account and their IMEI numbers.

Checking IMEI number through Settings

  • To see the IMEI number on Android, navigate to Settings > About > IMEI. Scroll down to get the IMEI information by tapping Status and scrolling down.
  • Tap Settings > General > About and scroll down to IMEI on an iPhone.
  • The IMEI is printed on a sticker inside the phone, under the battery, on most other phones with a replaceable battery. To check, remove the battery.

Checking the IMEI Number on Retail Box or Bill

The IMEI number is stated on both the retail box and the bill, which is an excellent incentive to save both instead of tossing them away. At the very least, keep the box because it will come in handy if you need to check the IMEI or if you decide to resell the phone later. The IMEI number will be printed on a sticker on the box’s side.

Conclusion

An IMEI number can come in handy if your phone goes missing or you want to sell your smartphone. If you are having trouble determining your phone’s IMEI number, you can use one of these effective remedies mentioned in this article.